
To change web hosting while keeping the domain name, follow this guide. The guide takes you through the step by step process to transfer wordpress web hosting from one company to another. The process of changing web host is completely safe and simple if you follow the steps precisely and carefully. I have also left warnings and notes in between, make sure to read each one and avoid any unforeseen problem while changing the web hosting company.

Steps to Change Web Hosting and Keep the Domain Name
The following steps will help you transfer the website from one host to another. For instance, you can migrate from Godaddy host to Hostgator or BigRock or any other web host brand or company. It doesn’t damage your site at all and keeps everything intact. However, in some cases, there could be some anomalies but those can be rectified easily.
Step 1: Create a new account on the new hosting company website and buy the hosting plan
Step 2: Keep new and old hosting accounts active unless the website is completely transferred to another host
Step 3: Login to the old host account Cpanel and click ‘File Manager‘. You may need to log in again

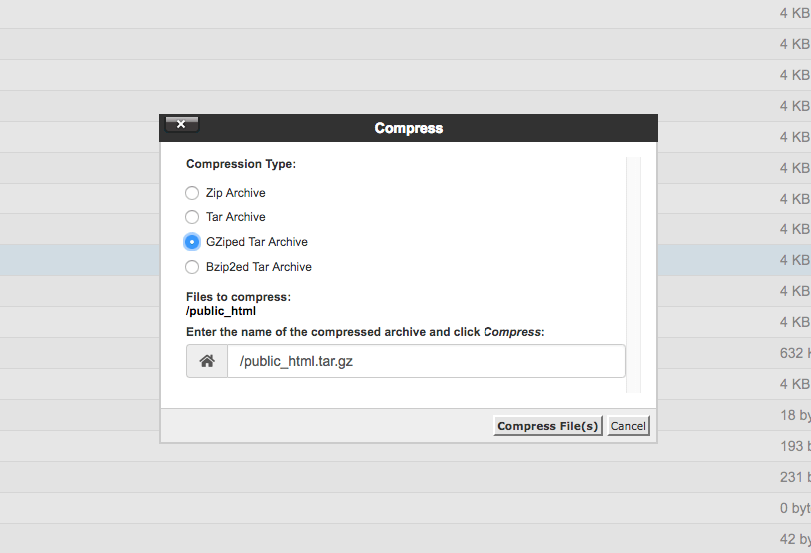
Step 4: In File Manager, single click public_html folder to highlight and click ‘Compress‘ option in the toolbar

Step 5: Choose the Compression type, preferably ZIP
Step 6: Enter the compressed folder name or keep it default as ‘public_html.zip‘ and click ‘Compress‘. Wait for a while for the process to complete.
Step 7: Click the Compressed folder, i.e. public_html.zip to highlight and click ‘Download‘ button in the toolbar at the top. The compressed folder will be downloaded to your local system
Step 8: Now go back to the Cpanel and click ‘Backup Wizard‘. Click ‘Backup‘ button and then click ‘MySQL Databases’

Step 9: Click the database of your website to download it

Now that we have both site backup and MySQL database backup, we can head to the new web host CPanel. So go ahead, login to your new web hosting account to access the CPanel and then continue to follow the below steps:
Step 10: Go to ‘Backup Wizard‘ and click ‘Restore‘ this time
Step 11: Click ‘MySQL Databases‘ and then click ‘Choose File‘

Step 12: Browse the downloaded SQL database file. It must be with file extension ‘.sql.gz‘, select it, click ‘Choose‘ and then click ‘Upload‘ button
This will restore the database. You can go to MySQL Database option to check and confirm database file. So now we need to restore the backup web files to the file manager.
Step 13: Click the File Manager on CPanel, choose ‘Home Directory‘, click ‘Show hidden files‘ checkbox, and click Go
Step 14: Go to the public_html directory and upload the compressed folder backup we downloaded in step 7.
Step 15: Click ‘Upload‘ from the top toolbar

Step 16: Click ‘Choose File‘ and browse the compressed folder backup file and select it to upload

Step 17: Once the upload is finished, go back to the File Manager and delete all the files in the folder except the compressed folder file we just uploaded
Step 18: Click the compressed folder file to highlight and then click ‘Extract‘
Step 19: Click ‘Extract File‘ button and wait for it to finish the extraction process. After extraction, a new public_html folder will appear
Step 20: Double-click to open it and then select all the files by clicking ‘Select all‘ checkbox at the top
Step 21: Click ‘Move File(s)‘ at the top in the toolbar and then edit the path from /publick_html/publick_html to public_html/
Step 22: Click ‘Move File(s)‘ button. That’s it.
Step 23: Go up one level and delete empty ‘public_html‘ folder
Now that files are extracted and moved to the public_html folder of your new web host CPanel, you can delete the public_compressed folder if you want. If you have space, you may keep it as a backup.
Step 24: Now enter the web host IP to load the website. You can now change your DNS (domain name servers) with the new DNS, i.e.
ns1.yourhostname.com
ns2.yourhostname.com

That’s all you need to do to safely migrate web hosting from one company to another without breaking your website. If you wish to move a larger website which is not possible to move with CPanel tools or if you wish to migrate your website to a cloud server such as DigitalOcean or Vultr virtual cloud web servers, wait for a while as I will be posting a complete detailed guide to migrate website using the command line interface and FileZilla. Comment down below if you need any help or want us to upload a help guide on migrating websites or repairing the errors and bugs that arise during the migration.
Hope you find this guide helpful and if you did, please subscribe to our newsletter below. We do not spam and you will be notified whenever we upload a new how-to guide.
