")
Table of Contents
DISCLAIMER: This guide is created for the educational purpose and shows that one can install macOS Mojave 10.14 or OSX on PC without Mac. This works for non-Apple hardware but Intel-based Windows laptops and PC. The guide explains how it’s done. The process explained is a part of ethical hacking macOS for Non-Apple Windows and Linux desktops and Laptops. If you wish to remove the content (DMCA), please reach us via contact us page.
Let’s learn how to Install macOS Mojave 10.14 on any Windows or Linux laptop or PC without Mac. This guide will help you install macOS X on PC running on the 7th and 8th Gen processors. The best thing about this macOS Mojave Installation guide is that we don’t need a MacBook for this.

Thus, if you own a Windows Laptop powered by either Kaby Lake or Coffee Lake processors, proceed with this tutorial. If you own a system with older generation processors such as skylake and below, you can still use this guide but need to replace a few files in clover to install and run macOS Mojave on a Windows 10 laptop.
Further, if you want to install macOS High Sierra 10.13.6, follow this guide on how to install macOS 10.13.6 High Sierra on a Windows PC or Laptop without using a Macbook or macOS.
NOTE: This is the simplest and the easiest How-To guide on macOS Mojave installation on the internet with all the screenshot and video guides. However, currently, these videos are offline coz. Apple Inc. raised a copyright claim on our macOS MojaveInstallation video, and we got a strike on our YouTube channel. So we had to take down all macOS installation guides.
However, we will soon upload them to other platforms such as Vimeo and on our Facebook fan page. On TechPosts, we always try to create a video guide along with the post and you will find almost all posts with a video guide. And that’s what makes us different.
How to Install macOS Mojave 10.14 on a Windows Laptop or PC
BEFORE YOU BEGIN…
Before you begin the installation, let me make myself very clear. I or TechPosts cannot be held responsible for any damage, whatsoever if anything happens to you or your system by following this guide. This is entirely for educational and learning purpose. So proceed with this guide at your own risk.
Steps to Install macOS Mojave10.14 On PC without Mac
We have prepared all the necessary files required for installation and tried making this guide more straightforward for better understanding. So all you have to is download, copy, and paste. In case you find it difficult, follow the process as shown in the embedded macOS Mojave installation video guide.
Step 1. Backup Drive and Data [Highly Important]
Backup the entire drive or all the critical data from the system before you begin installing macOS on the internal drive if you have dual storage, no problem. Just don’t touch Windows OS drive.
However, we still highly recommend you to back up the internal drive data as we will be formatting the hard drive for macOS Mojave installation. Which means any data on the drive will be permanently lost. So be careful and create a backup to be on the safer side.
Step 2. Create a macOS Mojave Installer for PC
To create a macOS installation media, you need at least 8GB USB thumb drive. However, 16GB is recommended. And make sure it’s USB 3.0 for quick installation.
- Download the macOSMojave.dmg file which is around 5.6 GB
http://getintopc.com/softwares/operating-systems/macos-mojave-v10-14-18a391-app-store-dmg-free-download/
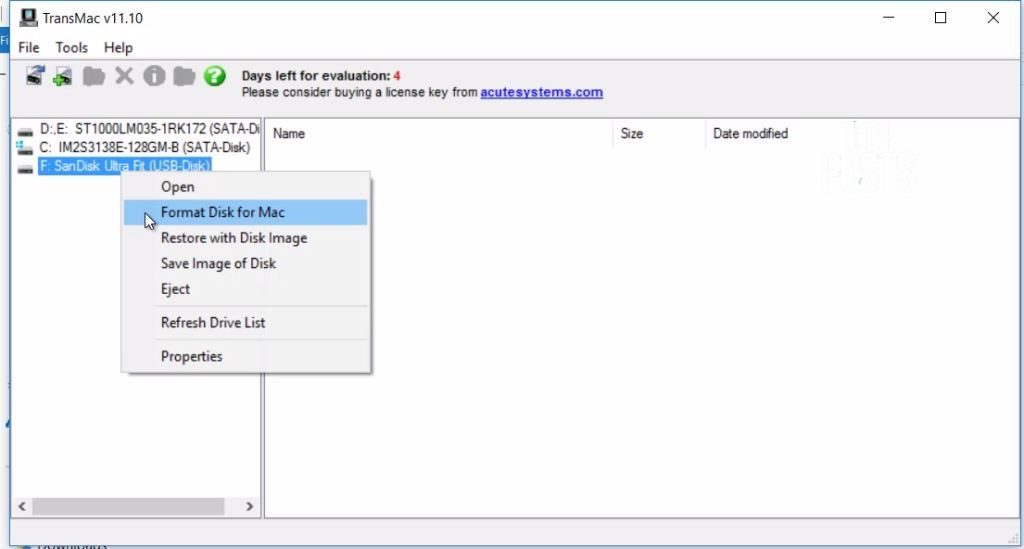
- install TransMac app on your PC.
- Connect USB Thumb drive to your PC and then run Transmac application as administrator.
- Then right-click on the USB Thumb Drive and click Format for MacOS.
- Right-click again on the USB drive but this time select Restore from Disc Image
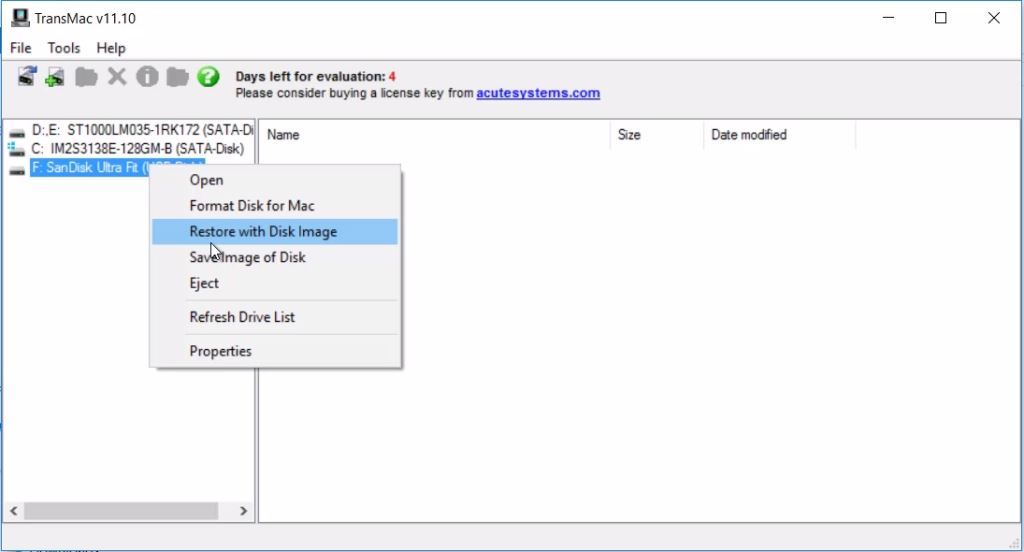
- Now browse the MacOSMojave.dmg file you downloaded and select it
- Click OK to proceed. Now, this can take a while depending on your system speed
- Once it’s finished, you can go to ‘File Explorer’ and then open the thumb drive partition
- Inside the partition, you will see a few files and folders- delete everything. Don’t format drive
- Download the compressedEFI folder and then extract the CLOVER and BOOT folders to the USB Thumb drives EFI partition

- Now that you have copied the EFI folder, shut down your system
- Press the power button to turn on the PC and immediately start pressing BIOS key usually F2 as the system boots.
Then change the following settings:
- Deactivate Secure Boot.
- Under virtualization, disable VTD or VT for Direct I/O.
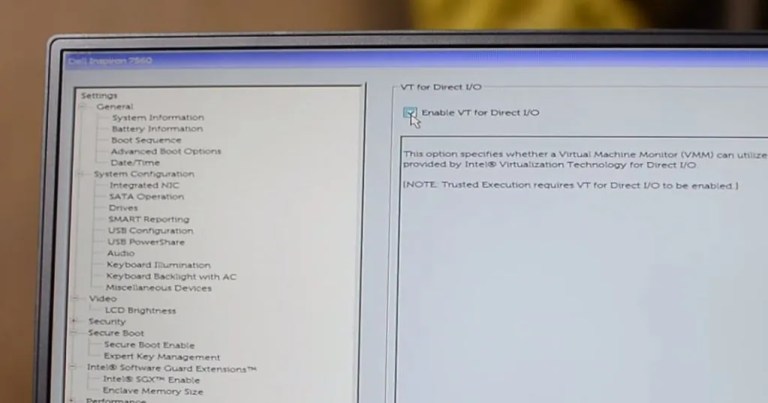


That’s it. Now save changes and reboot your system.
As system reboots, press F12 continuously to see Boot options
- From the boot options list, select your thumb drive containing macOS Mojave Installer as boot drive by using arrow keys and hitting the Enter key

- On boot, you will see this clover bootloader screen. From here, you need to select the disk that says ‘Boot macOS Install from Install macOS Mojave’.

Step 3. Installing macOS Mojave 10.14
You will see the Apple logo, and it will start loading the installation file.
Now if you get any error here, I want you to please take a screenshot, upload it to the cloud and share the URL via comments or reach out to our Facebook fan page. Please mention system properties otherwise I will not be able to help you fix any error.
If everything is good, you will see the installation window.
Proceed to the next step by pressing the forward arrow button, and agree to all terms and conditions.
- Next, open DiskUtility. Then choose the drive where you want the Mac OS to be installed
- Make sure the volume or disk is empty as this will delete all data from the disk.

- Select the disk and click Erase
- Give a name to the drive such as macOS MojaveDisk, then choose Extended(Journaled) and GUID Partition from the respective dropdowns.
- Hit erase, this will format the hard drive and make it ready for macOS Mojave Installation
- After eraser, close the Disk Utility program and select the Install macOS.
- Agree to terms, select the formatted drive and hit Install to begin the Mac OS Mojave installation on your Windows PC.

- This may take 20-30 minutes, depending on your system and storage type (USB 3.0 or HDD/SSD).
- SSD will be quicker than the traditional hard disk drives. Once the installation is finished, you will see a message that says,macOS could not be installed on your computer.
- Just ignore this message as macOS Mojave is successfully installed on your system. This is an error message. So ignore it and click on Restart.
- Again press F12 system restarts to choose USB thumb drive from the boot options
- Then in clover bootloader, select Boot from macOS Mojave Disk.

- This will boot the MacOS Mojave from the disk where we installed it. This may take a while and once it boots up. Do the initial setup like Choose Region, Timezone, Agree to terms etc.
- Then choose an account name and enter a password.
- That’s it, finally select between Light and Dark mode and your system is ready to use

So now that you have successfully installed the latest macOS Mojave 10.14 on your Kaby Lake laptop or PC, check which hardware is working and what’s not.
- To check this, click ‘Apple icon at the top left and click About System
- Click the System Info tab and check what all hardware is detected

Comment down below what’s working and what’s not so that I can help you fix what’s not working in your macOS Mojave Windows PC.
CONCLUSION
Now at this point, you should have successfully installed the macOS Mojave on PC without using Mac. This works for all Windows Laptops and PC powered by 7th and 8th Generation Kaby Lake and Coffee Lake processors.
Again, if you get any error, share with me via comment section down below. I will try to answer each and every one. But if everything works fine, share the system configuration, EFI folder (if you have modified) to help other enthusiasts.
Please stay tuned for more such guides. Subscribe to our newsletter and YouTube channel for instant updates.

75 comments
Hi friend, I even managed to install it, but I have the integrated Intel HD 620 card, and I could not get it to work, it always gets 4 mb of vram … if you can help me, thank you very much. I have a Dell Inspiron 5566, i7 7th generation, 8gb ram.
Visit ‘How to fix IntelHD Graphics in macOS High Sierra Hackintosh‘
Okay, I installed mac sierra, so far so good, but when I upgrade to version 10.12.6, it starts loading the apple bar, and reboots the notebook, every time it reboots and does not enter.
Will not the hackintosh be incompatible with my notebook?
I would love to install it with the graphics working and everything else, but since I’m a beginner in this hackintosh business I suffer a little … if you have a little time and want to help me, my friend, thank you very much.
Hello! Your tutorial is perfect! I was able to install on my Laptop (Dell Inspiron 15 7560). My jack audio isn’t woking and I cannot login on my apple account neither download apps from the Apple Store (get the error “The operation couldn’t be completed. (com.apple.commerce.client error 500.)”. Do you know how can I fix it?
Hey. I restored the disk image with transmac and I can’t access the drive without formatting it. When I look in my partition manager, there is only one partition that is unallocated. Please help, thanks.
Use MINI Tool Partition wizard like Here:
http://techposts.org/macos-mojave-install-without-mac/
how do you delete the files and replace them with efi
Just open the EFI partition and delete it. Then paste the new EFI folder. Moreover, I am working on a new guide which is fairly easy. It will be live this week. Subscribe to get update notification.
I do not understand this part of the tutorial:
“Once it’s finished, you can go to ‘File Explorer’ and then open the thumb drive partition
Inside the partition, you will see a few files and folders- delete everything. Don’t format drive
Download the compressedEFI folder and then extract the CLOVER and BOOT folders to the USB Thumb drives EFI partition”
Sine I’m not using a mac, I can’t access my usb through file explorer. I’m using transmac for that but I can’t see any files to be deleted other than “instal macOS Mojave.app” and “donotreadme”. Moreover, I do not understand where to copy and paste the EFI folder. What do you mean by copy and paste it in EFI partition?
Use Mini Tool Partition to assign a drive letter to the boot(EFI) partition and then download and run Explorer++.exe as administrator to edit the files.
There is only 1 Partition on my USB so how do i Paste the efi Files on the usb
Use mini partition tool to find and assign letter to the EFI partition. This will mount the partition where you can paste the EFI files.
Nice tutorial! It worked on my main pc. However, will it work with a i7 4790 (4th gen, not 7 or 8)?
Awesome, Lou. Thanks for sharing.
Dude, thank you for your post, but you need to be more specific on how to pass what Khalid Trad said. I can’t assign a drive to my usb using minitool. There no such option!
Hey, i am unable to access the USB drive after Restoring the Image, what to do now ? I tried Mini Tool, and it just gives me an option to Create a new Partition
I can’t access my USB after Restoring the image, i tried mini tool, and it only gives me an option to create a new partition, what to do now ? Please guide, thank you!
Hello sir I installed Mojave successfully on same hardware but intel wifi isn’t working pls guide
Intel wifi isn’t supported. USe Opencore to make it work.
will it format a whole hard drive or only partition on which it will be installed
Is there a way to go back to windows later?
This is about dual-booting MacOS with Windows. Please use the OpenCore for MacOS installation. This method is deprecated.
i cant open the thumb drive in file manager