Hello and Welcome to the new How to Guide from Techposts.org. Today in this How-to Guide we will show you how to Install Android 5.0.2 Lollipop on USB Drive and boot on any windows, Linux PC or Mac, that is dual boot – Android Lollipop with Windows 7, 8 or 10, Linux or MAC.
Update – What’s New in Lollipop 5.0.2 x86:
- Wifi and Bluetooth Working perfectly fine.
- PlayStore and Google Apps preinstalled
- Much better than previous 5.0 Update
- Many other important Bug Fixes
The following video shows installtion of Android x86 on the internal Hard Drive of your System along with Windows and Linux (Dual/Triple Boot).
Android mobile operating system is an open source system software available for various smartphone, tablet devices and Desktops too. In our previous Videos we shown you How to install Android 4.4.4 Kitkat on PCs but This time we will be installing the latest Android version which is ANdroid 5 Lollipop on external USB drives ( External Hard disk, Pen Drive or MicroSd Card).
With This installation Method, Users can multi Dual Boot Android with Windows on PC and Laptops powered by x86 (32-bit) or x64 (64 Bit) computer architecture hardware. Users are required to Download Android x86 ISO File and can install it via bootable USB flash drive or bootable CD/DVD.
Advantages of installing on External Hard Disk or USB Drive :
- No need to modify Windows BCD/Master boot partition or format hard disk.
- Don’t need to install Grub bootloader on your Machine.
- Your Windows will work as it was working before, so you don’t have to worry about uninstalling Androidx86, just remove the usb drive and you are good to go.
Step1. Things you’ll need ?
- 1 USB Flash Drive or Bootable CD/DVD.
- 4GB Free USB Disk Space for Android installation. (use a 4 or 8 GB Pen drive, SD Card or external Hard disk)
- Android x86 5.0.2 Lollipop ISO File. Download it from Here
- Universal USB Installer Tool to create bootable USB thumb drive. You can Find the Links in Description.
Installing Android on PC
Step 2: By using Universal USB Installer Tool, Make a bootable USB flash drive using the ISO image file that you downloaded.
Select Android from the Drop Down menu, Then Browse the Android x86 ISO file and then select the USB Thumb Drive and Hit Create Button.
Step 3: After that, Restart your PC or Laptop via USB flash drive as the source. (Make USB to boot first and before CD/DVD ROM under your system’s BIOS settings)
Step 4: Now, When the menu appears, just select Install Android x86 to External hard disk or Pen Drive/Sd Card. You can also Run it As a Live Cd which means that if any changes made, they will not be saved. But if you install it on USB Drive or internal hard drive, then any changes that you make will be saved next time you boot android.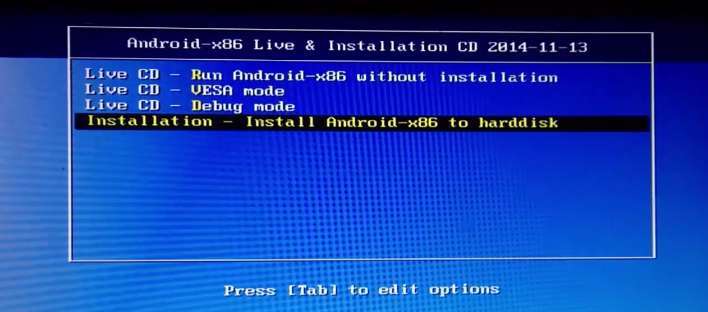
Step 5: Select your appropriate external hard disk partition to install Android x86 i.e. you can see in the image below: “sdb1 win95 FAT32 v220w” is the external USB Drive partition other than the installation media or you can install on any new partition.
You can format the USB drive to ext3 or ext2 partition to get more internal storage.
Step 6: Now, You will get a few prompts messages pertaining to installation of GRUB Bootloader. Make sure to allow it.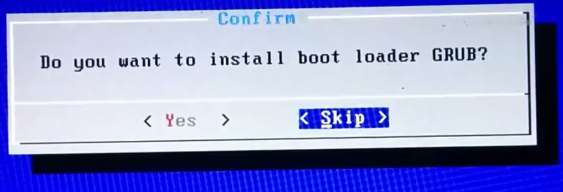
Step 7: Now, another prompt message will ask you to make system /r/w. Hit Yes on this as well, especially if you’d like to modify your Android x86 installation later.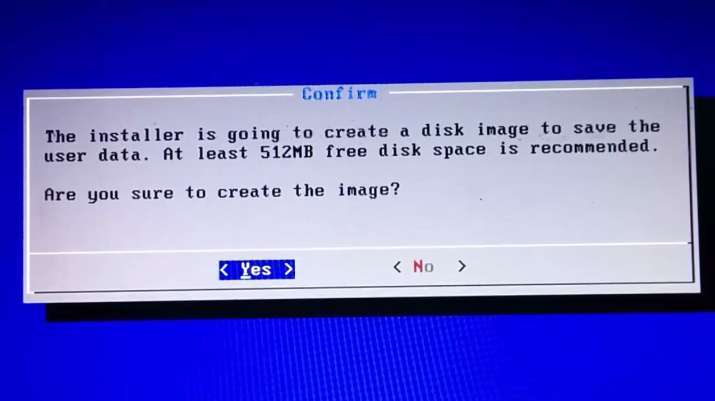
Step 8: After that, you will get another prompt to install virtual SD card. Use 2048 MB for space, as that’s the maximum supported.
Step 9: Now, You can Restart your Windows PC / Laptops. After Reboot, You can select to either boot to Android by inserting USB Drive and boot from it or Windows.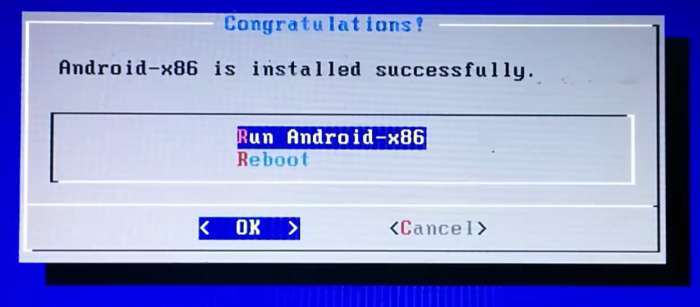
Voilah! You’re done. Congratulations!! You have successfully installed Android 5.0 Lollipop on USb drive. Enjoy this latest update.
If you have any questions or feedback, please use comment box below. If you face any problem during Installation, please contact us, and we’ll do our best to solve your queries.
Subscribe us for more such How to Guides on Android, iOS, Windows, Mac and Linux below or Connect with us to stay updated for more on Facebook, Google+and Twitter.
Before You Go…
Just wanted to let you know thatWe’ve launched YouTube Channel where we upload awesome video content. Make sure you hit the subscribe button to stay up to date with the new videos we upload every week. Also Subscribe us for more How To Guides and Reviews…!!! @http://youtube.com/checknma for more How to Guides. Enjoy..!!!
Hi, after following it step by step, I got it to work, but I can’t seem to connect to the Internet via wifi. The wifi can be detected but fails to connect to network.
Check your router’s Wireless settings if you using Mac Filtering. In case still doesn’t work, please install stable version which is Android Kitkat 4.4.4 R2. Follow this link.
hmmm , how to do a live cd directly without going to that menu ?
maybe something like :
find –set-root /blank.iso
map /blank.iso (0xff)
map –hook
root (0xff)
kernel /casper/vmlinuz file=/cdrom/preseed/ubuntu.seed boot=casper iso-scan/filename=/blank.iso splash
initrd /casper/initrd.lz
I’ve successifully installed on my Dell Optiplex 760. The issue now is that most of the games I have cannot be controlled with keyboard or mouse. Is there a way of making this possible or which games can i install which support keyboard control?
Use app like Gamepad that let’syou use your keyboard for playing games on android. You can use virtual D-pad and use mouse for game controls.
have a problem with my nvidia 210 gforce . .can’t seem to make it work cause the display shatters the image after android boot logo apears. do you know how to fix this . i have a dell optiplex 760
That’s graphic kernel problem. You can install Stable version Android x86 4.4 R2, download iso from Android-x86.org and install it.
Can i install lolipop to internal drive.
Yes, easily!!
I tried the Mediafire link, but it doesn’t seem to work. It asks for captcha, but when I click “authorize download”, once again I am taken to the same page. Any help? Also, few months back I tried Lollipop 5.0.2 installation on hard disk. The installation worked, but I never got past the boot screen. Any solution for that?
The site loops you about 5 times with capchas before finally allowing you to download.
Might happened with you but if you enter correct captcha it will show you download link!! It’s mediafire’s security can’t change that.
Hi, thanks for your help.
I have a basic problem: I can’t make a bootable usb for my uefi pc.
You said to use Universal USB Installer Tool (and it’s the one used in the next step) but you linked rufus, I’ve download UUI from official site, follow your tutorial, but I can’t make it boot on uefi pc (UUI use a MBR partition for boot). I’ve tried also with Rufus, but it can’t make a bootable usb with GPT partition (the one that uefi needs) when the efi file is missed into the iso image… I’m missing something?
Use EFI Image of Androidx86 4.4 for Installation in your UEFI (GPT partitioned) enabled System or simply visit How To Run Android 4.4 on UEFI Computer and Notebook. for instructions.
my pc name ASUS X555L CORE i5 x64 bit….. this file x86 … not work my pc……..plz tell me solve the problem…..
I’ve been trying to install androidx86 to my pc, when am asked to choose partition I select sd1 and format to ext3, the next thing it tells me ‘installation failed, ensure you have enough space on you hard disk’
anroid grub is not working….rather it boots my windows directly ……..and when i checked the partition which i installed android its not even used …..help Ravi Singh
it ia running perfect but video on youtube shows red screen and video doesnt plays also some apps not working
Hello! I have problem. When I restart my computer with USB in, it will take me on flashing screen and I must turn off computer + take off usb.
Try another iso, preferably, any iso of Android 4.4 x86 and try booting via USB.
Hi. Im 11 years old.I done it. It boots up perfectly but there is no mouse pointer. My mouse worked perfectly in android 4.3. I downloaded from media fire. Pls help
If this is the case, then i would suggest you to install Android 4.4.4 Kitkat x86 ISO which is the most stable release till date and you can install/run games and apps as mostly are supported. BTW Good Work!! 🙂
it for all pc . what is minimum requriments
Min. 512MB RAM, 4GB HDD Spac, 1Ghz Processor.
Hi from your this blog you provide dude we can install android 5.0 in pen drive right from this we can use this pen drive on any other PC also and boot computer by pen drive
When I restart the PC and boot it from usb , it says that “No DEFAULT or UI image found”
Offer after stupid timewasting offer of complete bullshit. I cant stand these websites the promise one thing and do nothing but have peoplle type their personal info like address and dob. Grow the fuck up and be professional
In the steps 1 to 4 to create the USB flash drive, I add a step 2a to make the Android on flash drive persistent, as if it wereinstalled on disk:
1. Download TOPORESIZE tool (a zip file) and unpack it.
2. run TOPORESIZE.BAT
3 select CREATE NEW and store the file somewhere on your own hard disk as DATA.IMG
4 set the filesize (as large as will fit in the free space on the flash drive). Note that it is difficult to choose an exact size (the numbers are in Megabyte), but a mouseclick in the slidebar will increment the size. 100 clicks will give 200kb of space.
5. copy the DATA.IMG to the flash drive, and , by miracle, Android has its permanent storage.
Forgot to write: format as EXT2 type (for small pen drives)
Martin
Can you please explain where you put the data.img file on the pendrive which is to be used to store the bootable Android system. Does it need to go in a special directory? I have followed the instructions of Singh including your 2A insert but when I boot up the pendrive and select install onto the hard disk (no opportunity to install on s external drive is given in Yumi 2.0.2.9) I do not get an option to select anything – the system goes on a loop searching “Detecting Android-x86”. Can you please provide more explicit instructions?
after installation of android in usb flash drive, can i use usb flash drive for another work (like copying files etc)? can i format the usb flash drive?
Yes you can. Just remember the files stored in it after installation. Better make a new folder inside and store all files in that folder. 🙂
when i install an app, have to reinstall it on any start? i mean, can’t save the apps on the usb?
Better install Android 4.4 R3 update instead of Android Lollipop as Kitkat version is much more stable, comes with preinstalled Playstore and supports most apps from playstore.
I ran as live cd, but when I run a game the screen is horizontal and will not rotate, tried settings no help… mouse is inverted as well.
Go to settings>Display or Settings>Accessibility and turn off AutoRotate screen to keep screen orientation in Landscape Mode and Reboot
Can you use an ethernet connection instead of WiFi? If so, how?
Yes, you can but DHCP only. I haven’t tried it on Android-x86 5.0+ but it works with Android-x86 4.2+. All you need to do is connect ethernet cable coming out of a modem.
it dosent work for me on 5.0
but i also dont know if it is dhcp or not
how to know?
help please i instal like the instruction
but it’s stuck on android logo (bootloop
I want to try doing this install on a PNY 16Gig USB. My question is will I not be able to use all the space available on the USB? Second question is, I have a Lenovo ThinkPad 11e N2940 and I just want to be sure if anyone knows if I might run into any problems with Android 5.1 on this laptop or should I use an earlier release?
Thanks 🙂
help me please
when i try to boot to android
its say
ata1 softreset failed (device not ready)
help me please
ok, i got it to install & with no problems. but the big problems i have are
1) on a asus ROG G750JW with nvidia 765M vid card with 2GB DDR5 dedicated memory, 8GB DDR3 memory and 1 TB HDD, the 5.02 is ultra laggy…though the mouse works but it moves at a snails pace almost like a slide show..
2) when connecting to a WIFI, i put my password in 3 times and it kept refusing to connect to a WIFI network.
right now am going to attempt to install 4.4 r3 and see if that helps me out any…the good thing about me is i have a image back up of my rig so if anything happens all i have to do is throw the recovery disc in and run the image file and BAM everything comes back as if nothing happened at all..
i meant i had no problems installing 5.02
I installed Lollipop=x86 onto a previously gParted formatted ext2 usb stick – if the usb stick was formatted by the android-x86 installer as ext2 or ext3 it gave a Grub error 17; so prior formatting with gParted overcame that bootloader error
usb stick was 16gb, and all space is available
Thanks for that update antdavisonNZ !! 🙂
I’m installing Android 5.0.2 to an USB External Hard Drive to multi boot with Windows 10 64 bit. How would I format it before I start. It is just quick formatted NTFS?
Already Replied to one of your same comments.
Good Luck!! 🙂
I’m installing on an USB External Hard Drive that is just formatted NTFS. It will be dual booting with Windows 10 64bit. So the USB External HD is ready when I go to install Android 5.0.1 how show I format & partition it. It just 1 whole partition formatted as NTFS now.
No need to create partitions on your USB HD. Simply Install Windows 10 first and then go ahead and Install Android Remix OS on same HD partition without formatting it. That’s all you need to do. Now when you boot from USB HD, you’ll be able to choose between two OS – Windows 10 and Remix OS (based on Android). Read more about Console OS here.
Good Luck!! 🙂
I need help .i try to install android in my usb pendrive .and completed step 9 .after restart .
screen giving error
(tGRUB Loading stage 1.5.
GRUB loading ,please wait…..
Error 17)
i try it to many time ..every time this error comes ..
plz help me to install android in my usb pendrive ….
Install the latest stable Android OS in USB Drive to run on any PC. Please follow this guide on How to Install Android Remix OS on Windows Laptop or PC (USB Drive)
If I Install Android On My Laptop, Can I get Back To Windows When I Want?
Please Mail Me At dishusharma7771@outlook.com asap!
Yes, easily!! All you need to do is to boot PC using Windows installation DVD or Windows Bootable USB drive and repair Windows boot sector. To know exactly how to do this , please refer to this article How to Uninstall Android x86 4.3, 4.4 or 5.0 from PC or Laptops
Bro, youre genius bt I have a question , Can I use it like a normal Android phone, I mean if I install something and boot on another device i’ll get my apps?
Yes, you will!! All changes made will be saved. All apps and data will be saved everytime you make any changes to your portable Android OS Stick.
enjoy!
It sounds wonderful and i have yet to try it.
BUT i am in china and have no access to youtube (or google and many other things! 🙁 )
That’s sad but good luck!