The internet world is considered insecure because of the number of unethical and malicious websites scrolling across the web. Google along with various companies is consistently making efforts towards making the browser secure and safe.
This can be done using DNS (Domain Name System) different from the default ones which are connected to the internet. These custom services can help you to access any website and have a good user experience.
Read this article, we will walk you through the steps to change the DNS server on all popular Wi-Fi devices and introduce you to some of the best DNS server options available. By doing these changes, you’ll be able to get a faster and more secure internet experience in no time.
What are DNS Servers?
DNS is considered a phonebook of the internet. Just like how you can use a phone book to search for the phone number of a person, the DNS server helps your computer find the website you want to visit on the internet.
Every website has its unique IP address, just like every phone number is unique. However, it’s much easier to remember a website name (www.google.com) than its IP address (172.217.15.238). That’s where the DNS server comes in.
Whenever you type something on the browser, the DNS searches it with the corresponding IP address so that your computer can load the website on the screen.
This way the DNS server is responsible for translating the website names into IP addresses, making it easier for us to access the websites we want to visit on the internet.
Before you move ahead, here’s a detailed guide on how you can make a DIY adblocking DNS server for your home network to block ads, trackers and spam websites, enable safe search and parental mode, etc.
How to Change DNS Servers on Popular Wifi
Changing the DNS servers on any router is not a complicated process. As every Wifi manufacturer uses a custom interface for their router, the process can differ from one router to another.
Change DNS Server on Linksys Wi-Fi Routers
Linksys makes minor changes to its administration page after releasing a new series of routers. Go through the below procedures to change your DNS servers from the setup menu.
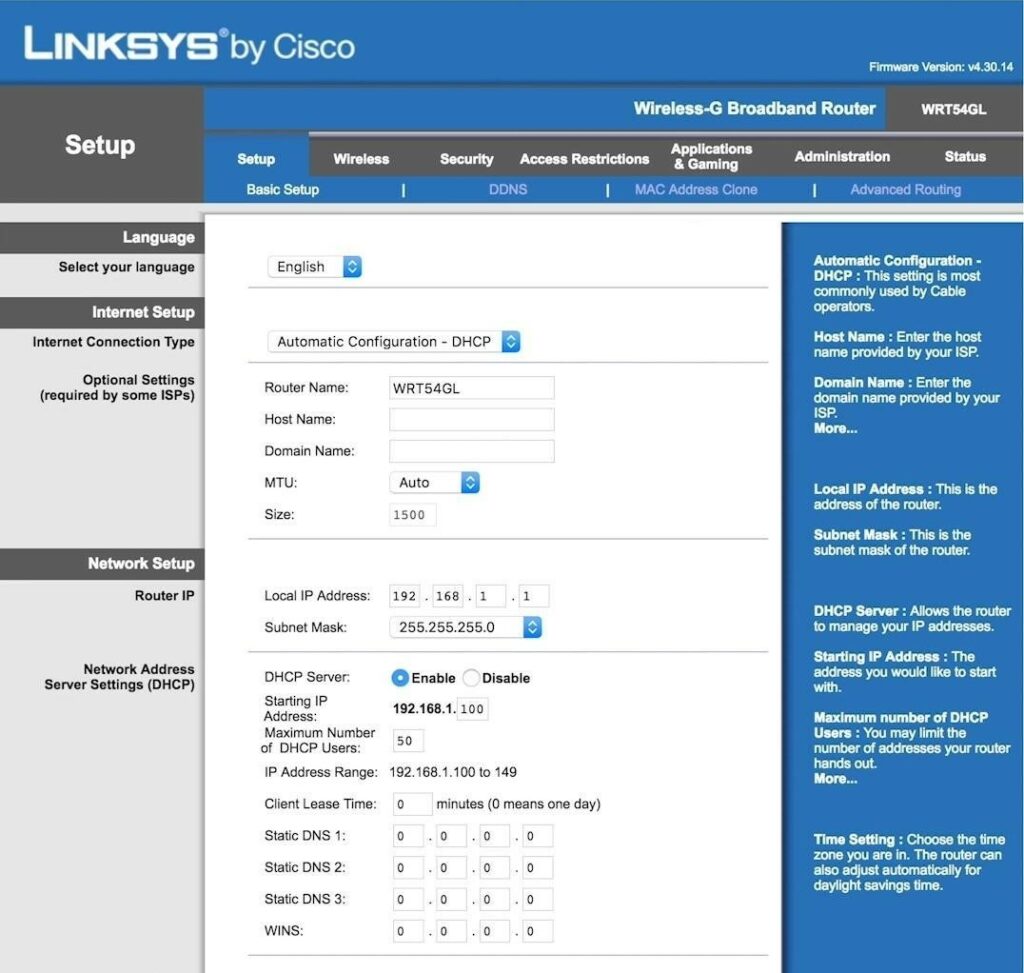
- Signup to your router web-based administration page, or usually at http://192.168.1.1.
- Choose Setup in the top menu.
- Now click on the Basic Set-up in the submenu.
- Enter your primary DNS Server in the Static DNS 1 field. Make sure to enter at least one address.
- Again Enter the secondary DNS server in the Static DNS 2 field.
- In the Static DNS 3 field leave it blank.
- Click on the Apply button to confirm settings.
Note: Most of the Linksys routers won’t restart to take effect, but if the router admin asks, enable it.
Change DNS Server on D-Link Wi-Fi Routers
D-LINK is among the popular routers for users. However, if you want to change DNS Server on a D-Link router.
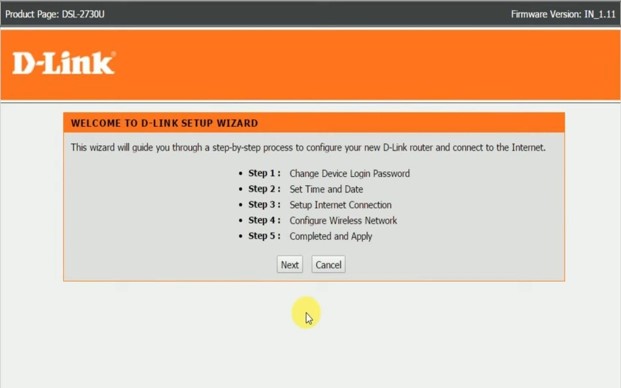
- Go to your D-Link router page using this address http://192.168.0.1.
- Click on the Internet option on the left side.
- Choose the Setup option from the menu.
- Look for the Dynamic IP (DHCP) Internet Connection Type option.
- Now enter your Primary DNS Server into the Primary DNS Address field.
- In the next Secondary DNS Address, enter your secondary DNS server.
- Click on the Save Settings button.
If the settings won’t change automatically, but If it doesn’t you need to reboot the router to complete these changes.
Note: The exact steps might differ based on the model and firmware version of your D-Link router. If you need additional help, consult the router’s user manual or contact D-Link support.
Change DNS Server on TP-Link Wi-Fi Routers
Go through the following steps on how you can change the DNS Server on the TP-LINK router.
- Go to the TP-LINK router website or type http://192.168.1.1 or http://192.168.0.1 on your browser.
- Choose the Network option on the left pane.
- Click on WAN under the Network option.
- Click on the Use this DNS Servers section.
- Enter your DNS server on the next page.
- Click on the Save button to apply the settings.
Both of the given IP addresses work for the router. If somehow it is not showing any effect, look for the specific model on the TP-LINK support page.
Change DNS Server on Google Wi-Fi Router
Google doesn’t provide access to its Wifi settings using its IP address. You must use their application to change the DNS servers.
- Open Google Home App on your device.
- Choose Wifi on the next screen.
- Click on the settings/gear option on the top and scroll down to the Advanced Networking option.
- Click on the DNS and Select Custom.
- In the Primary Server text field, Enter the DNS server on the WiFi.
- In the Secondary Server, Enter an optional secondary DNS server.
- Click the “OK” option to save the settings.
Almost all the Google WiFi points which are connected to a single network use the same DNS servers. One must pick only one server for every WiFi point.
Change the DNS Server on NETGEAR Wi-Fi Routers
NETGEAR has various default gateway addresses for its router. You can change the DNS servers of NETGEAR either using Basic settings or the Internet menu.

- Go to your Netgear router website or you can type http://192.168.1.1 or http://192.168.0.1 on your web browser.
- Choose Basic on the next screen.
- Click on the Use These DNS Server in the Domain Name Server (DNS) address section.
- Enter your primary DNS in the Primary DNS field.
- And a secondary DNS server in the Secondary DNS field.
- Click on Apply to save the settings.
Change DNS Server on ASUS Wi-Fi Router
You can change the DNS server on the ASUS router through the LAN menu. Run through the below steps on how to do it.
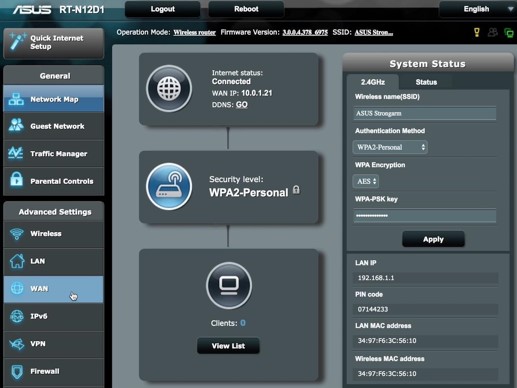
- Go to the ASUS routers admin panel or type http://192.168.1.1.
- Choose your Network i.e. LAN or WAN from the menu.
- Choose the Internet Connection given on the top page.
- In the WAN DNS Settings section, Enter the primary DNS Server in the DNS Server 1 text box.
- In the DNS Server 2 text box, Enter the secondary DNS server.
- Click the Apply button to save the settings.
- Now restart your ASUS router to apply the changes successfully.
Change DNS Server on CISCO Wi-Fi Router
Here’s how to change DNS Server on your Cisco router using the LAN menu.
- Go to your CISCO router page or visit http://192.168.1.1 or http://192.168.1.254.
- Choose the Setup option in the menu.
- Click on the LAN Setup button under the Setup option.
- In LAN 1 Static DNS 1 field, Enter primary DNS Server.
- In LAN 1 Static DNS 2 field, Enter the secondary DNS Server.
- If your router has a LAN 1 Static DNS 3 field, leave it blank or type another DNS server.
- Click on the Save Settings button to apply the changes.
- While some cisco routers require you to restart your router to apply the changes.
Change DNS Server on TRENDnet Wi-Fi Router
You need first to visit the advanced page to change the DNS servers. Follow the simple steps to change your DNS servers on TRENDnet Router.
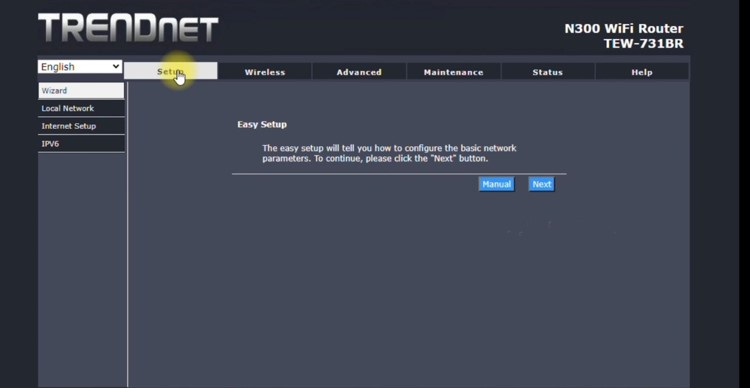
- Login to TRENDnet router account or type http://192.168.10.1 on your browser.
- Click on Advanced options and choose Setup menu option.
- Click on the Internet settings submenu under the Setup option.
- Choose the Enable button next to the Manually Configure DNS.
- In the Primary DNS box, enter your primary DNS Server.
- Use a Secondary DNS Server if you have a secondary DNS server.
- Save these settings by clicking on the Apply button.
Read more about : 5 Reasons Why You should Upgrade Your Old Wi-Fi Router Right Now
Last Words
Lastly, we can say changing the DNS server on your popular Wi-Fi router is an easy process that can offer you a range of benefits, from faster internet speeds to improved security. Whether you’re looking to fix connection issues or customize your internet experience, changing the DNS server is a step worth considering. With the above-written article, you can easily change the DNS server on your specific Wi-Fi router and enjoy a better, more customized internet experience.