In the previous guide, we shared how you can install macOS Catalina on an External USB hard drive or SSD volume without damaging your existing macOS Mojave system. In this guide, I will take you through the steps to install macOS Catalina 10.15 on a Windows PC or Laptop powered by Intel processors.
Before You Begin
You will need a Macbook or Mojave Hackintosh, to begin with. If you don’t have one, use your friend’s MacBook or Hackintosh system. We need that to create the macOS Catalina USB installer.
And please back up your important files from your Hackintosh system. If possible, clone your existing Hackintosh or use a different drive, preferably external to install macOS Catalina as we did in the previous post. Better safe than sorry!
Things You Need
- An 8GB USB 3.0 Thumb Drive
- A Windows PC or Laptop powered by Intel i5 or i7 Processor
- Patience
Step 1: Prepare macOS Catalina Installer
- Connect the USB thumb drive
- Open Disk utility
- Click USB Thumb drive and click ‘Erase‘
- Enter the volume name, choose Mac OS Extended (Journaled) and GUID Partition Map from respective drop-downs and click ‘Erase’

- Now, Download the Beta access utility or sign up the Macbook for Apple Developer to run Beta access utility and then download the Catalina update
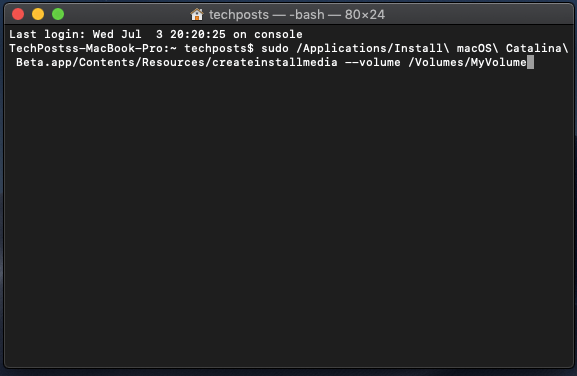
- Once downloaded, open Terminal Window and paste the following command. Replace MyVolume with your USB Thumb drive volume name.
sudo /Applications/Install\ macOS\ Catalina\ Beta.app/Contents/Resources/createinstallmedia --volume /Volumes/MyVolume- Press ‘Enter‘ and confirm the drive before typing yes.
- Wait for it to finish.
- Now download and run EFI Mounter app
- Select USB disk number and double click to access the EFI partition
- Download, extract and paste this EFI folder in the ESP partition
- Edit config.plist if your system isn’t powered by an i5 or i7 7th Gen Kaby Lake Processor
- Turn off system
Step 2: Change BIOS Settings
Access system BIOS, refer to your system or motherboard manufacturer for details. Do the following BIOS changes.
NOTE: If some setting is not available, that’s OK. Proceed to the next step.
Step 3: Begin macOS Catalina 10.15 Installation
- Open Disk Utility from above options
- Format an empty drive (internal or external) to APFS with GUID Partition Map. Please ensure the drive doesn’t contain any data
- Click ‘Erase’ and then exit the utility
- Now Select the formatted drive and click Install after agreeing upon the Terms and conditions
- The system will restart a few times, make sure you select the right drive from Clover bootloader options to install and boot macOS Catalina after installation
- Then you have to set up your system for the first time
That’s it.
Comment if you face any error or need help in installing macOS Catalina on your Windows PC or laptop. Read our other Hackintosh guides for more help,
- How to Install macOS Mojave on HFS+ and Avoid APFS
- [GUIDE] Dell 7560/7460 macOS Mojave 10.14 Installation without Mac
- How to Install macOS Mojave 10.14 on Windows PC/Laptop
- Install macOS High Sierra without APFS Conversion on PC
- Install macOS High Sierra 10.13.5 on Laptop or PC using Windows


