
Table of Contents
Setting up a Samba server on your Raspberry Pi is a practical way to enhance your home or office network. With a Samba server, you can seamlessly share files and printers across different operating systems.
This guide will walk you through the process of installing and configuring a Samba server on your Raspberry Pi. This will enable you to effortlessly share directories and files with anyone in the local network. Whether your devices are connected through a wired or wireless (Wi-Fi) network, the Samba server ensures compatibility with a wide range of operating systems, such as macOS, Windows, Linux, iOS, Android, etc., making collaboration and file sharing a breeze.
Things You Will Need
To set up a Samba server on your Raspberry Pi, you’ll need the following:
- Raspberry Pi board (e.g., Raspberry Pi 3, Raspberry Pi 4, or Raspberry Pi 5)
- MicroSD card with a minimum capacity of 16 GB
- Official or compatible and stable power supply
- HDMI cable (optional)
- Compatible keyboard and mouse (optional)
- Router and Ethernet cable
These components will ensure that you have the necessary hardware to proceed with the Samba server installation and configuration on your Raspberry Pi.
Step 1: Install the Raspberry Pi OS
First, you’ll want to install the operating system onto your Raspberry Pi. Choose any Raspberry Pi (64-bit) OS – we went for Raspberry Pi OS Lite (64-bit).
When using the Raspberry Pi Imager tool to install the OS on a microSD card, remember to click the Gear Icon and turn on SSH. This allows you to access the Terminal from your Windows or macOS system remotely over the network.
After you’ve flashed the OS on the microSD card, stick it into the Raspberry Pi and connect the power to turn it on. The first boot might take a bit. If you have an HDMI cable handy, connect it to a display like your TV or monitor to see the boot process.
Step 2: SSH Into the Raspberry Pi
Once the Raspberry Pi has started up successfully, link it to your router using an Ethernet cable. If you prefer, connect a keyboard and mouse. Alternatively, you can use the Putty app on your Windows PC to access the Raspberry Pi Terminal via SSH.
Open Putty, enter the Raspberry Pi’s IP address in the Host Name (or you may also enter the hostname if you set it up during the OS flash process) field and click OK.
To find the Raspberry Pi’s IP address, check your router’s DHCP settings or use a network scanner app like Fing on your smartphone.
If the connection is successful, you’ll see a prompt. Click Yes.
Enter the SSH username and password you set up during the OS installation on the microSD card. Press Enter after entering the username and then the password. Note that you won’t see anything on the screen while typing the password.
Finally, run the following command to update and upgrade the Raspberry Pi OS.
sudo apt update && sudo apt upgrade -y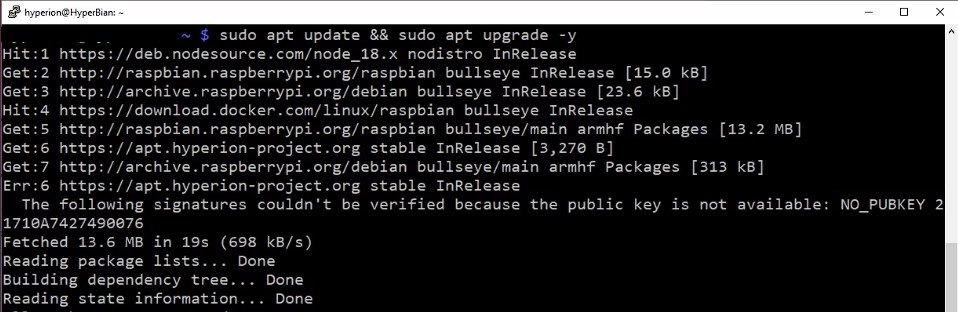
Assign a static IP to your Raspberry Pi via your router’s DHCP settings. Refer to your router documentation or visit the official site for more information.
Step 3: Install Samba on Raspberry Pi
To add Samba to your Raspberry Pi, simply enter the following command in the SSH Terminal:
sudo apt install samba
If asked, type ‘y‘ and hit Enter to confirm the Samba installation. The process should take a minute, depending on your network speed.
After the installation, type the following command in the SSH Terminal:
whereis sambaPress Enter, and you should see an output confirming that Samba is now installed on your Raspberry Pi.
Step 4: Create and Manage Samba Accounts
To create a Samba password for users on Raspberry Pi OS, remember that Samba uses a separate password from your system account. You can either set up a Samba password for existing users or add a new user and set up their Samba password.
For existing users, use this command:
sudo smbpasswd -a your_usernameReplace “your_username” with your SSH access username. Enter the password when prompted, keeping in mind that it won’t show on the Terminal.
To add a new user, use these commands:
sudo adduser new_usernamesudo smbpasswd -a new_username
Replace “new_username” with your preferred username. Confirm the password by typing it again. Once you’ve set up Samba users and passwords, you can proceed to configure a shared directory.
Step 5: Set Up Samba on Raspberry Pi
Navigate to the Home directory with the following command:
cd ~Then, create and grant permission to write/edit the directory with these commands:
sudo mkdir MySharesudo chown -R your_username:your_username /home/your_username/MyShare
Replace “your_username” with your actual username. These commands will create a new folder named MyShare in your home directory, which we’ll share by editing the Samba configuration file.
To edit the Samba configuration file, use the command:
sudo nano /etc/samba/smb.confThis opens the configuration file in the nano editor. Scroll down to the very bottom using the arrow keys and paste the following directory configuration block:
[SambaShare]comment = Samba on Raspberry Pipath = /home/your_username/MySharevalid users = your_usernamepublic = nowritable = yesbrowsable = yes
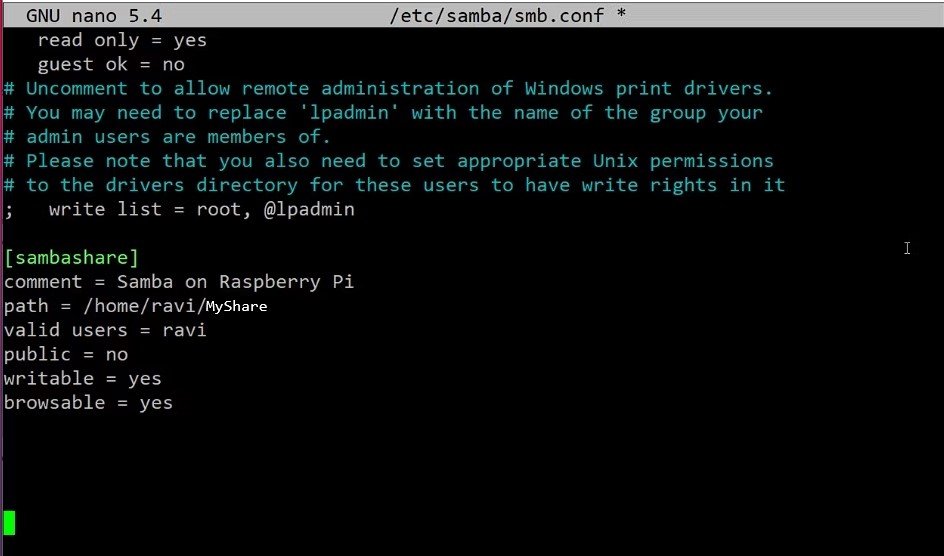
Press CTRL + X, type Y, and press Enter to save the changes. In the provided code, the “comment” describes the shared directory, and you can modify it as needed. In “valid users,” replace “your_username” with your actual username or create new usernames. You can also add new directories and include their names in this configuration block.
This setup allows you to control access to specific folders through the Samba SMB/CIFS protocol. Only authorized individuals, mentioned in the configuration block, can access the shared files and directories, ensuring security and control over network resources.
To apply the changes, restart the Samba service:
sudo service smbd restartAdditionally, update the firewall rule to allow Samba traffic:
sudo ufw allow sambaIf you encounter “sudo: ufw: command not found,” run sudo apt install ufw and then rerun the above command.
Access the Samba Server from Other Devices
To access shared folders via Samba on Windows:
- Press Windows + R, enter the Raspberry Pi’s IP address and press Enter.
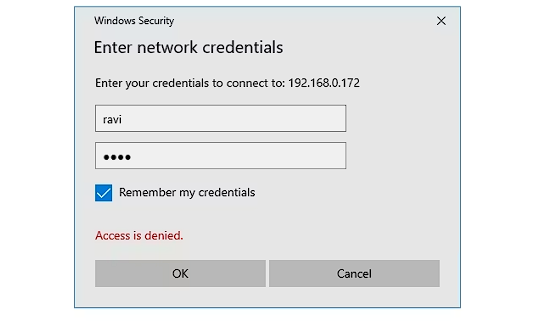
- Provide your username and password.
On macOS:
- Right-click Finder, and choose Connect to Server.
- Enter the IP address.
- Click Connect As, then Connect.
- Choose Registered User.
- Enter your username and password.

- Click Remember this password and Connect.
- Select the sambashare directory (or your chosen directory) and click OK.
Now you can easily browse, read, and write files in the shared directory. While you can use the leftover space on the SD card for sharing, it’s better to connect an external storage device for improved Samba performance. Another option is installing the Raspberry Pi’s operating system on an SSD for faster and more reliable sharing.
Conclusion
Setting up Samba on a Raspberry Pi provides an efficient and secure network for resource sharing. It’s a simple process, offering fast transfer speeds of 40-120 MB/s over both wireless and wired Gigabit connections, suitable for personal or professional use.