
Table of Contents
Recently, I made a DIY IR blaster using an ESP8266 module, which is available for less than $5 or INR 350. Although I have an Oakter IR blaster that I purchased from Amazon (for INR 1400) last year, it is too slow to respond to volume or temperature increase or decrease.
However, the Oakter IR blaster works well and can be controlled over the internet and through Alexa and Google Assistant. But the one we are going to build today works within our home network however, it’s much faster and works almost like an actual remote control. Unlike the pre-built IR blasters, such as Oakter, which takes at least 1.5 seconds to respond, there’s is almost no delay with our DIY IR blaster. Plus, it’s cheap and you will get to learn a lot.
Also, you can control the DIY IR blaster from your PC, Laptop, Tablet, or Android phone via a web browser.
Steps to Build DIY IR Remote using ESP8266
Below we have explained the process to build a universal IR remote controller using Arduino, ESP8266, IR LED, and IR Receiver sensor. This guide is divided into 5 steps where we will capture the IR codes from your IR remotes and then build the IR blaster using those codes to control any IR devices, such as TV, Home Theater, LED lights, etc.
We have also uploaded a video guide that you can watch here (coming soon).
Step 1: Purchases the Required Components
- ESP8266 Module (INR 350)
- IR LED (INR 10-20 from local store or online)
- A 2N2222 or B547 Transistor (INR 10)
- A IR Sensor, such as TSOP1738 (INR 20-50)
- A WiFi router (does not require internet, just any router)
TIP: You can buy these items at a much cheaper price from a local or online electronic store, such as Roboelements.com.
This DIY IR blaster is at least 3 times cheaper. Thus, you can build more and install them in each room.
Step 2: Install and Setup Arduino IDE
Download Arduino IDE for your Windows, Linux, or macOS and install it. Also, download and install the ESP8266 drivers. Then open Arduino IDE and follow these steps.
- Connect the Nodemcu (ESP8266 Module) via micro USB cable and then open Arduino IDE.
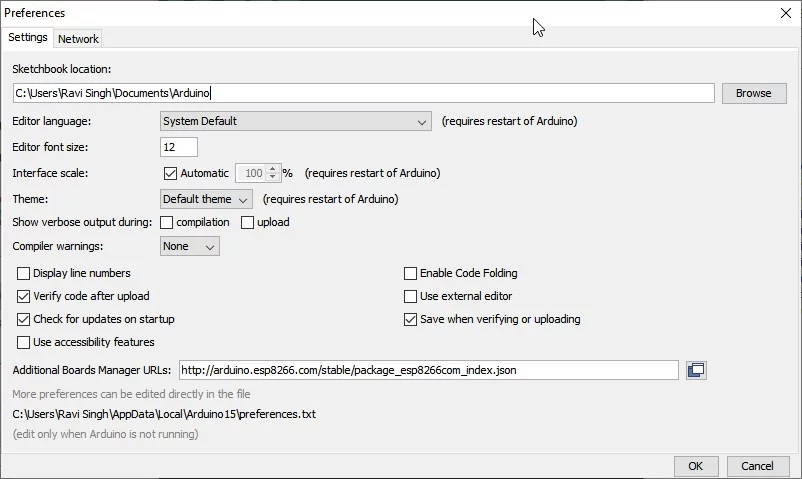
- Navigate to File>Preferences and paste the following URL in the ‘Additional Boards Manager URLs‘ box.
http://arduino.esp8266.com/stable/package_esp8266com_index.json
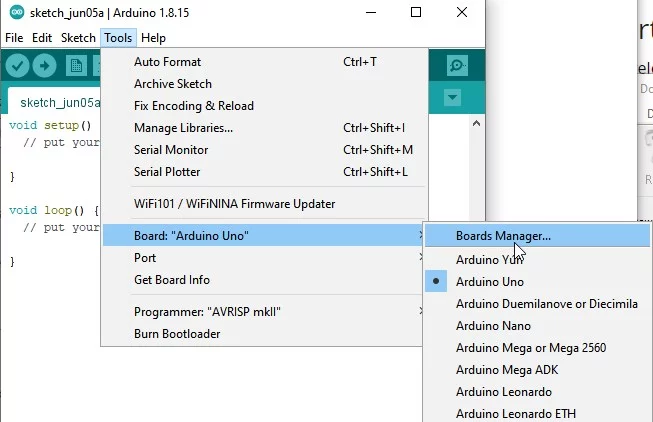
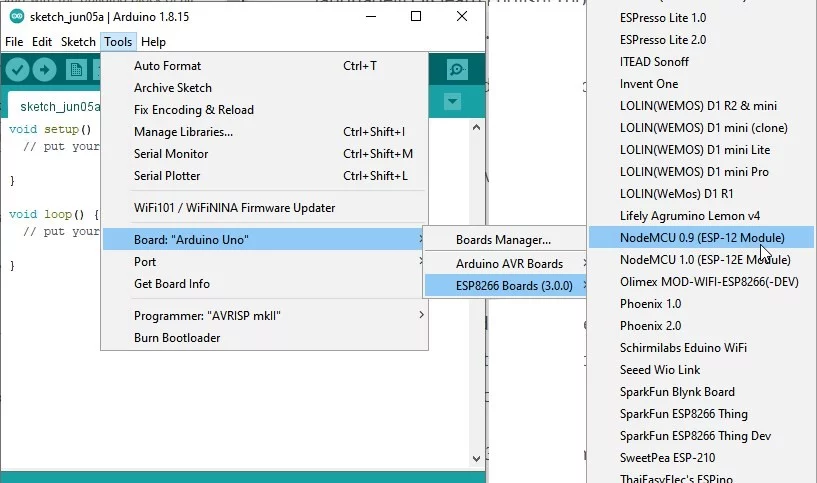
- Click ‘OK‘ and then go to “Tools>Board” and select “Boards Manager.”
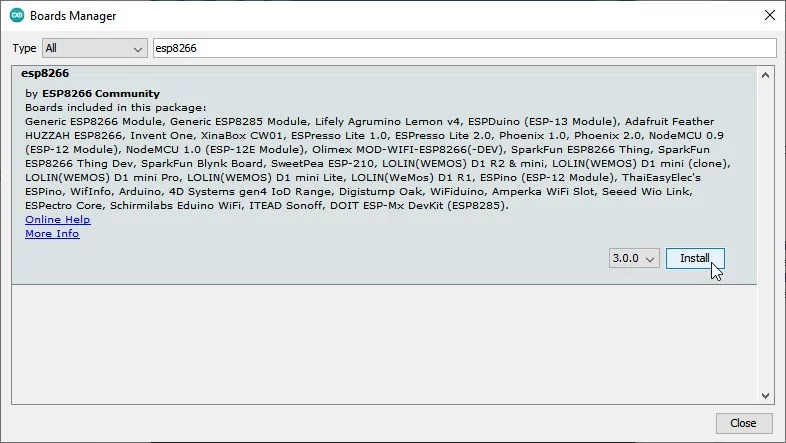
- Search ESP8266 and install it.
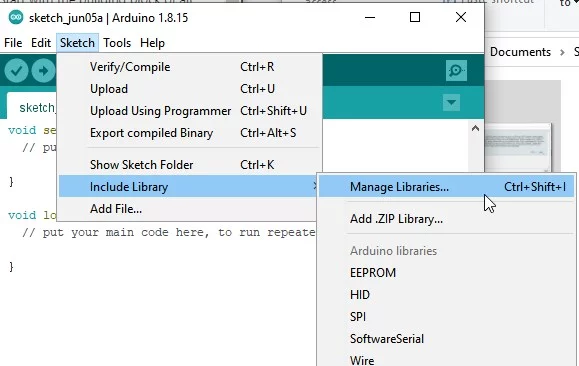
- Now go to “Sketch>Include Library” and click “Manage libraries.”
- Search and install “IRremoteESP8266” and install it.

Finally, click “Tools>Boards” and select “NodeMcu 1.0(ESP 12-E)” from the available options.
Step 3: Capture and Record the IR Codes
To capture codes, you need to first flash the following code using Arduino IDE.
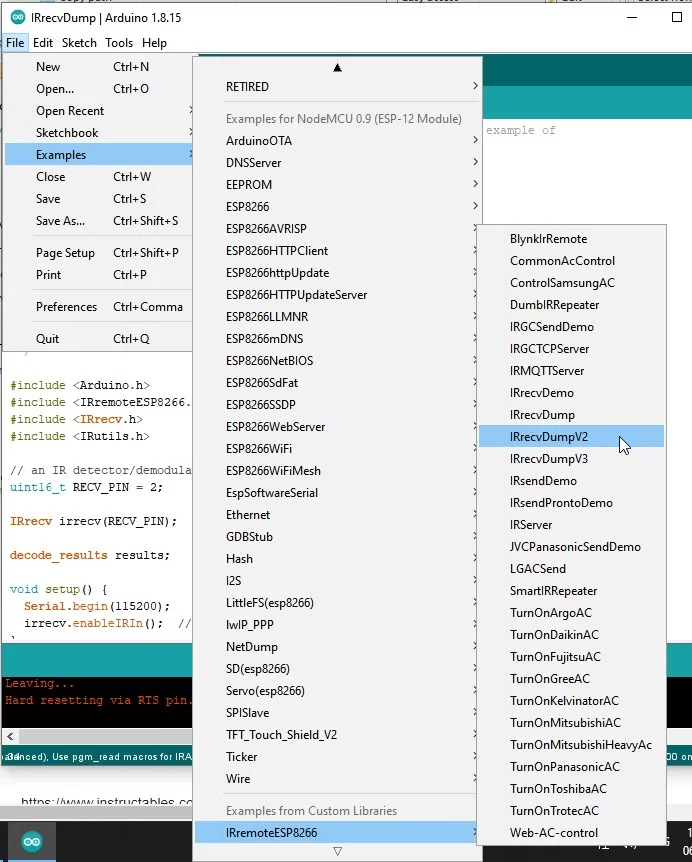
- Restart Arduino IDE and then go to File>Examples>IRRemoteESP8266 and select ‘IRrecvDump2.’
- Connect ESP8266 to PC and go to Tools>Port and select the COM port.

- Click ‘Upload‘ or press ‘CTRL+U‘ to flash the code.
Then connect the IR Receiver sensor TSOP1738 to ESP8266. Refer to the following schematics diagram.
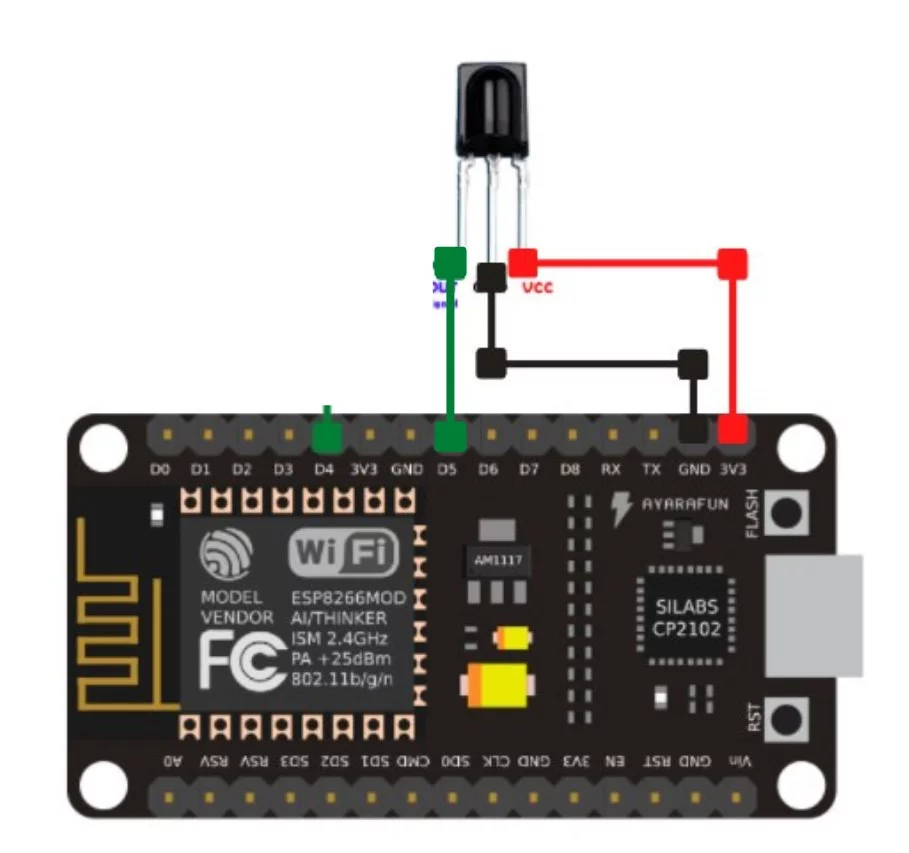
- Connect the the OUT pin to D5 pin of ESP8266.
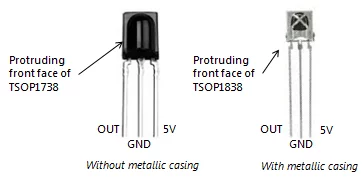
- Then connect the GND or middle pin of TSOP1738 to the Ground pin (marked as G) on ESP8266.
- Then connect the 5V pin of TSOp1738 to the 3V pin on ESP8266.
- Connect ESP8266 to PC again and click on the lens icon at the top right to open the serial monitor. Select 115200 baud rate from the drop-down.
- Now get your IR remote, such as TV remote or Home Theatre remote controller, and press the button in front of the TSOP1738 IR receiver sensor.
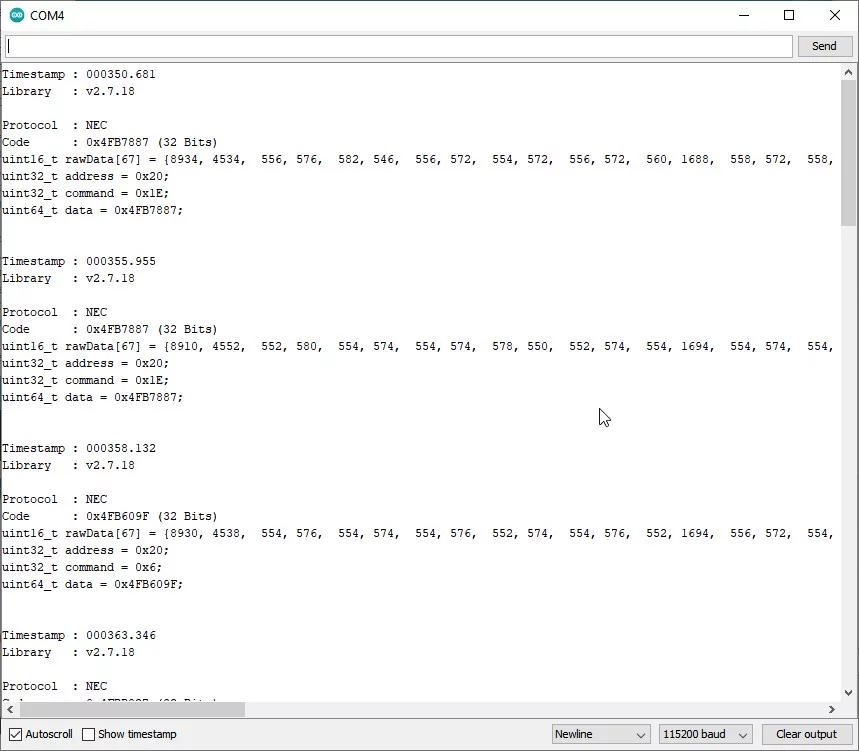
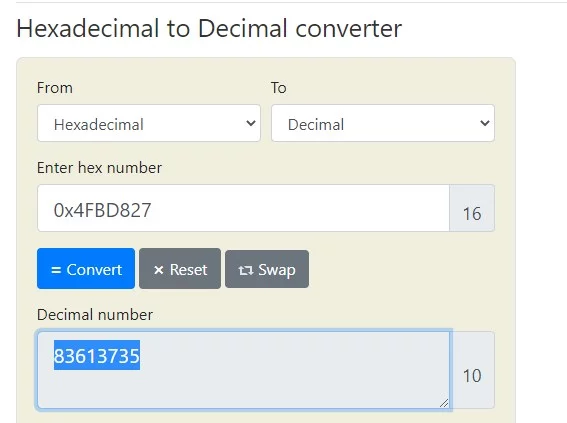
- The Serial Monitor will display the HEX code. You need to note down this hex code for each key like this in an Excel sheet.
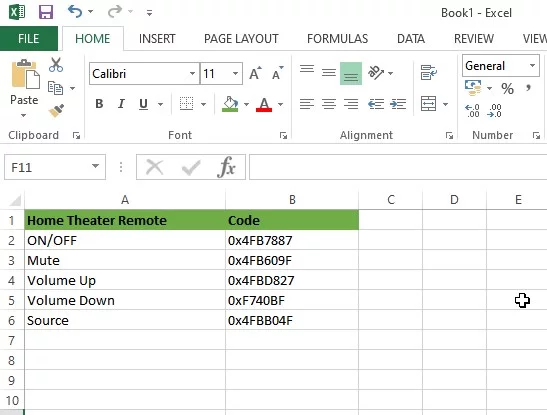
- Also, convert these HEX codes to Decimal using HEXADECIMAL to DECIMAL Converter tool.
Step 3: Build IR Blaster
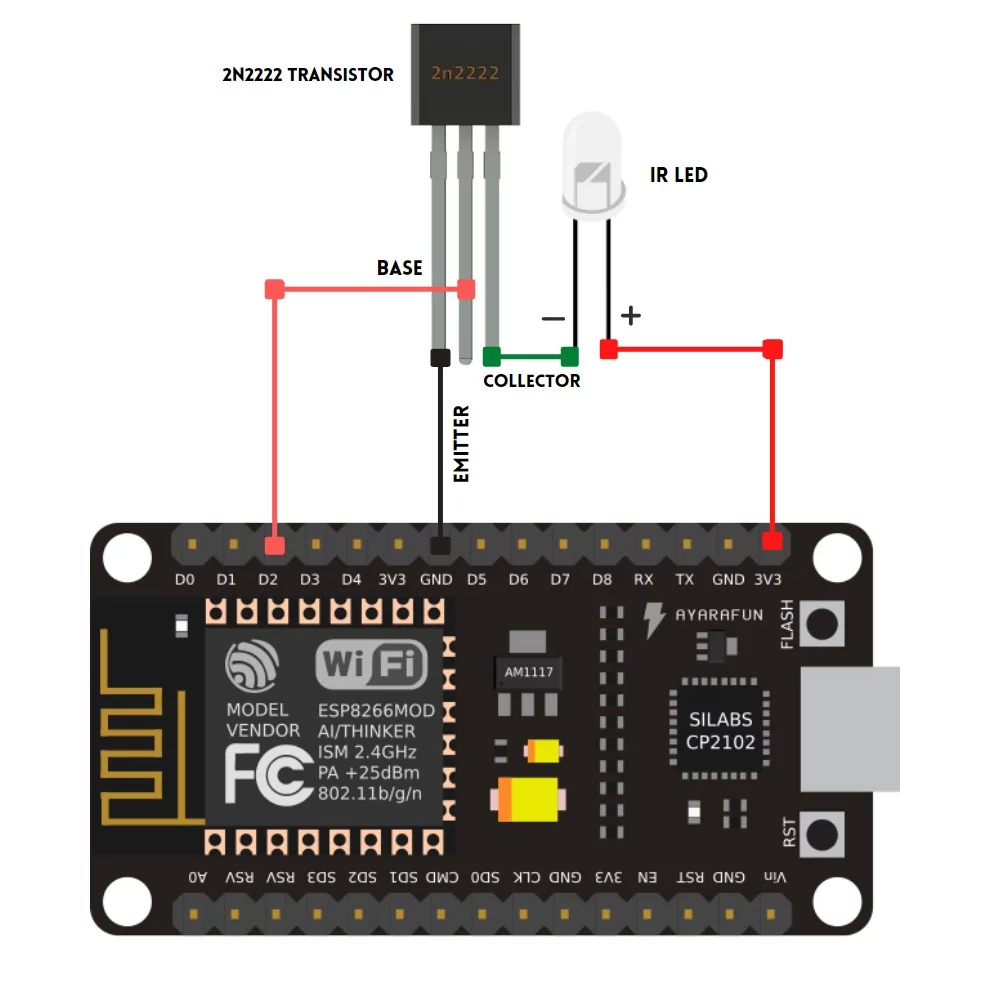
Once you have recorded all buttons and their HEX codes in an Excel workbook, it’s time to build the IR blaster to control all those devices. So disconnect the TSOP1738 and take out the 2N2222 or BC547 Transistor and the IR LED. Connect them as shown in the following diagram.
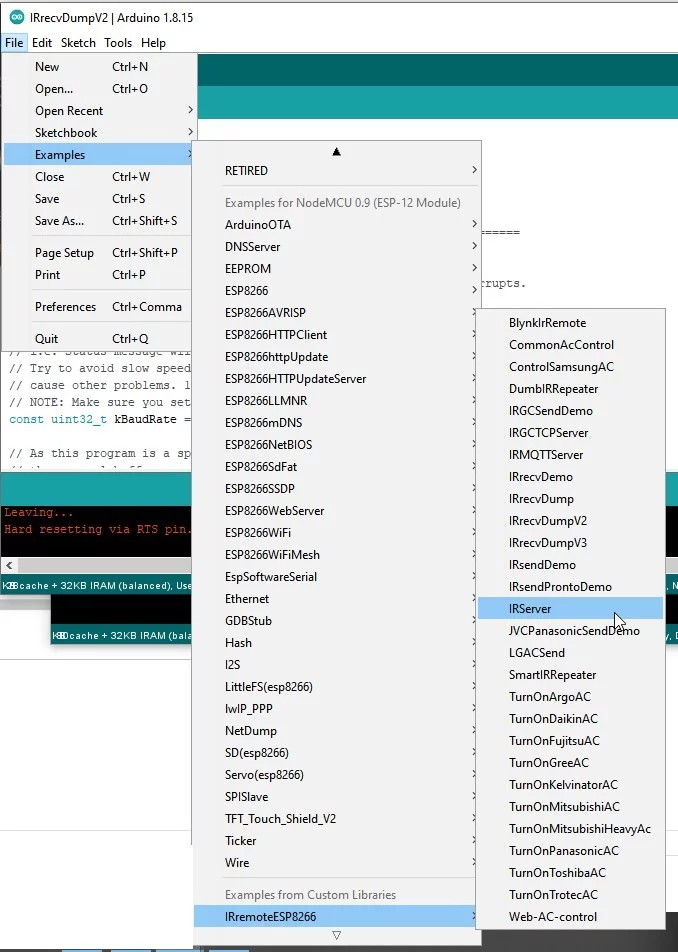
Once connected, go to Arduino IDE and navigate to File>Examples>IRremoteESP8266 and select IRServer.
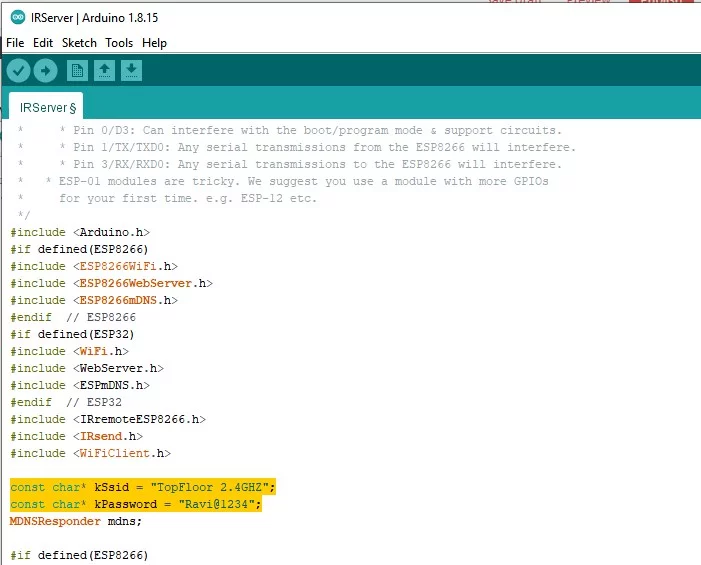
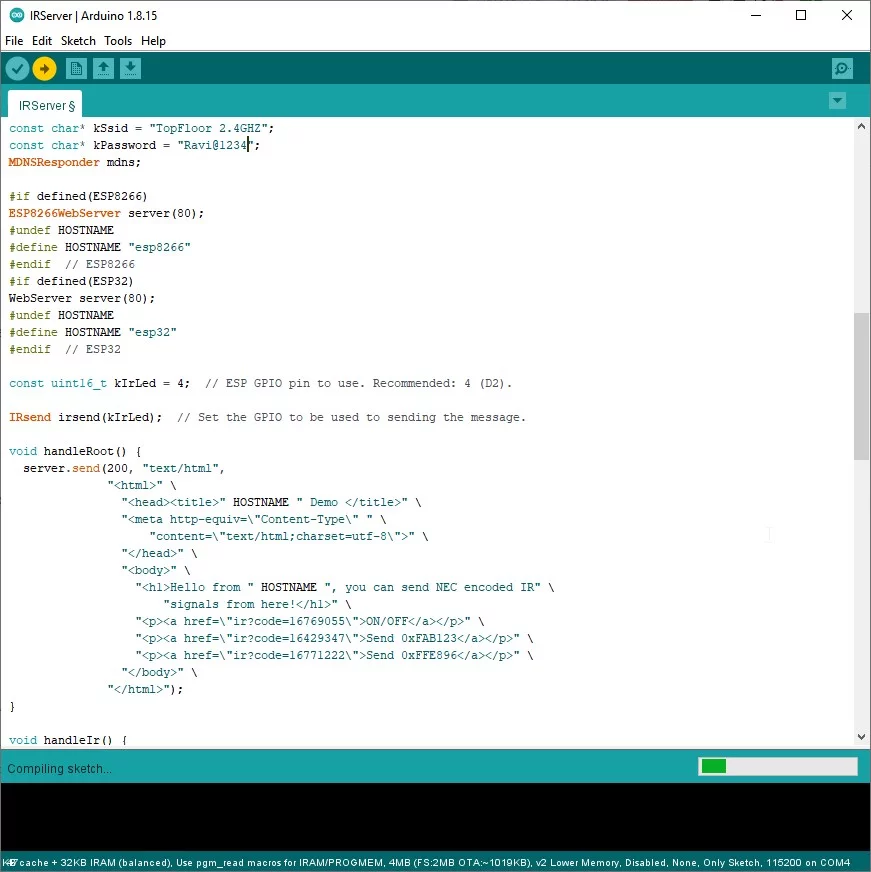
This opens a new IRServer.ino window. Scroll down a bit and add your WiFi SSID and Password. Replace the “……” with your WiFi SSID and Password as shown in the image.
Scroll a bit more till you see the code as highlighted in following image.

Now all you need to do is replace the “ir?code=” value to the converted decimal number (you converted earlier using HEX to Decimal Converter tool) of your remote controller button. You can also edit >Send HexCode</a> with remote button name, such as ON/OFF.
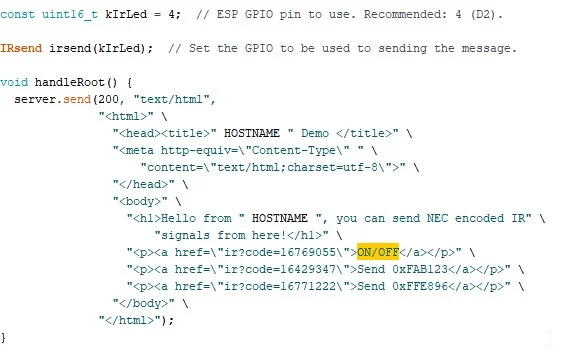
Similarly, you can add all your remote codes to the code. Just copy and paste following line of code below the exiting three to add more buttons.
"<p><a href=\"ir?code=16769055\">ON/OFF</a></p>" \Once you have added all remote control codes (in decimal numbers), click ‘Upload‘ or press CTRL+U to upload the code. After this, you are ready to control all your devices with this DIY IR blaster. You may add more IR LED in circular pattern for better performance.
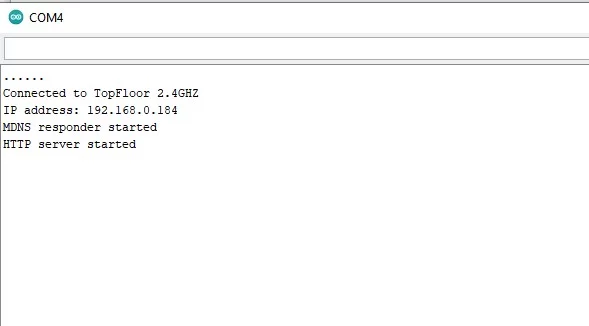
Open serial monitor to check the IP address.
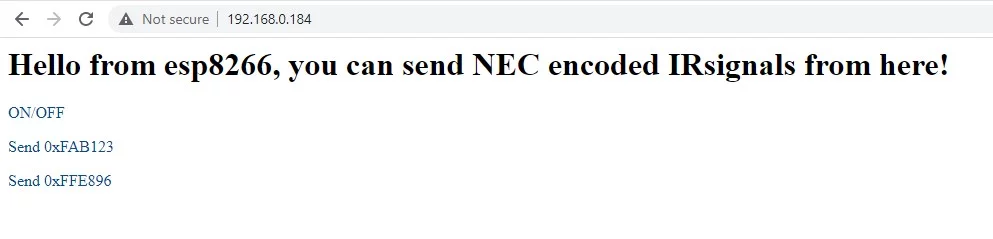
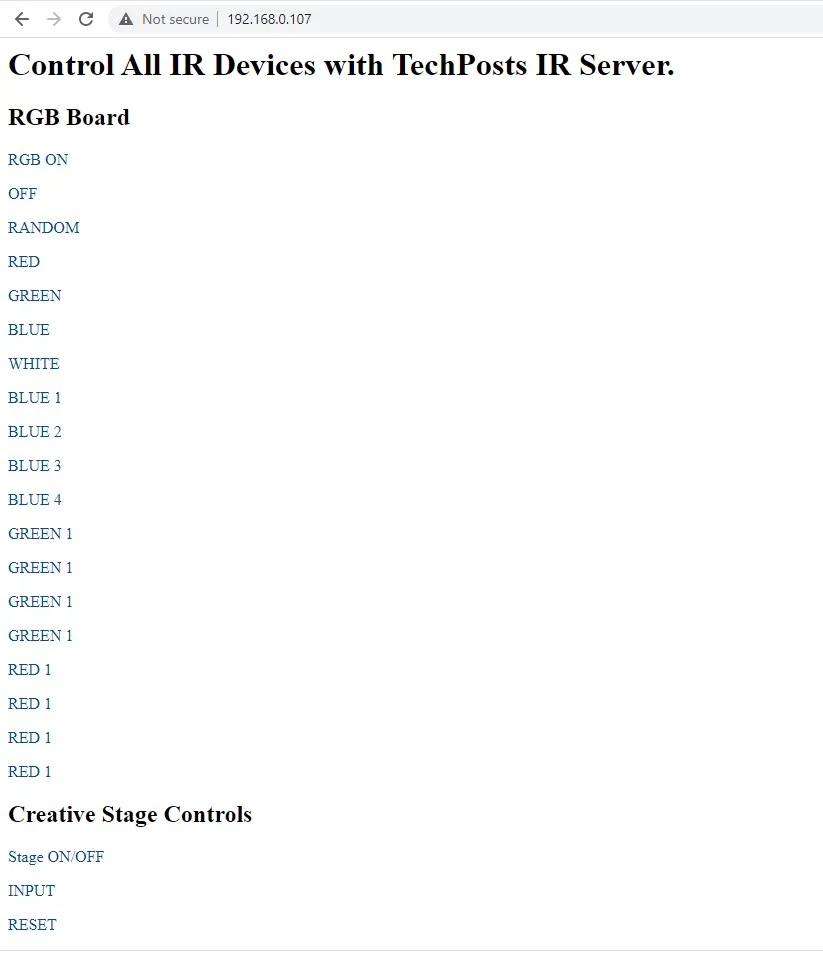
Then in your web browser (on PC or Phone), visit that IP address. You will see the linked buttons to control your IR devices.
You may also use my IRServer.ino code and edit/change values to have customized controls.
/*
 * IRremoteESP8266: IRServer - demonstrates sending IR codes controlled from a webserver
 * Version 0.3 May, 2019
 * Version 0.2 June, 2017
 * Copyright 2015 Mark Szabo
 * Copyright 2019 David Conran
 *
 * An IR LED circuit *MUST* be connected to the ESP on a pin
 * as specified by kIrLed below.
 *
 * TL;DR: The IR LED needs to be driven by a transistor for a good result.
 *
 * Suggested circuit:
 *     https://github.com/crankyoldgit/IRremoteESP8266/wiki#ir-sending
 *
 * Common mistakes & tips:
 *   * Don't just connect the IR LED directly to the pin, it won't
 *     have enough current to drive the IR LED effectively.
 *   * Make sure you have the IR LED polarity correct.
 *     See: https://learn.sparkfun.com/tutorials/polarity/diode-and-led-polarity
 *   * Typical digital camera/phones can be used to see if the IR LED is flashed.
 *     Replace the IR LED with a normal LED if you don't have a digital camera
 *     when debugging.
 *   * Avoid using the following pins unless you really know what you are doing:
 *     * Pin 0/D3: Can interfere with the boot/program mode & support circuits.
 *     * Pin 1/TX/TXD0: Any serial transmissions from the ESP8266 will interfere.
 *     * Pin 3/RX/RXD0: Any serial transmissions to the ESP8266 will interfere.
 *   * ESP-01 modules are tricky. We suggest you use a module with more GPIOs
 *     for your first time. e.g. ESP-12 etc.
 */
#include <Arduino.h>
#if defined(ESP8266)
#include <ESP8266WiFi.h>
#include <ESP8266WebServer.h>
#include <ESP8266mDNS.h>
#endif  // ESP8266
#if defined(ESP32)
#include <WiFi.h>
#include <WebServer.h>
#include <ESPmDNS.h>
#endif  // ESP32
#include <IRremoteESP8266.h>
#include <IRsend.h>
#include <WiFiClient.h>

const char* kSsid = "XXXXXXXXX";
const char* kPassword = "XXXXXXXXX";
MDNSResponder mdns;

#if defined(ESP8266)
ESP8266WebServer server(80);
#undef HOSTNAME
#define HOSTNAME "TechPosts IR Server"
#endif  // ESP8266
#if defined(ESP32)
WebServer server(80);
#undef HOSTNAME
#define HOSTNAME "esp32"
#endif  // ESP32

const uint16_t kIrLed = 4;  // ESP GPIO pin to use. Recommended: 4 (D2).

IRsend irsend(kIrLed);  // Set the GPIO to be used to sending the message.

void handleRoot() {
  server.send(200, "text/html",
              "<html>" \
                "<head><title>" HOSTNAME " Demo </title>" \
                "<meta http-equiv=\"Content-Type\" " \
                    "content=\"text/html;charset=utf-8\">" \
                "</head>" \
                "<body>" \
                  "<h1>Control All IR Devices with " HOSTNAME ".</h1>" \
                      "<h2>RGB Board</h2>" \
                      "<p><a href=\"ir?code=16236607\"> RGB ON</a></p>" \
                      "<p><a href=\"ir?code=16203967\"> OFF</a></p>" \
                      "<p><a href=\"ir?code=16246807\"> RANDOM</a></p>" \
                      "<p><a href=\"ir?code=16195807\"> RED</a></p>" \
                      "<p><a href=\"ir?code=16228447\"> GREEN</a></p>" \
                      "<p><a href=\"ir?code=16228447\"> BLUE</a></p>" \
                      "<p><a href=\"ir?code=16244767\"> WHITE</a></p>" \
                      "<p><a href=\"ir?code=16208047\"> BLUE 1</a></p>" \
                      "<p><a href=\"ir?code=16216207\"> BLUE 2</a></p>" \
                      "<p><a href=\"ir?code=16206007\"> BLUE 3</a></p>" \
                      "<p><a href=\"ir?code=16214167\"> BLUE 4</a></p>" \
                      "<p><a href=\"ir?code=16224367\"> GREEN 1</a></p>" \
                      "<p><a href=\"ir?code=16232527\"> GREEN 1</a></p>" \
                      "<p><a href=\"ir?code=16222327\"> GREEN 1</a></p>" \
                      "<p><a href=\"ir?code=16230487\"> GREEN 1</a></p>" \
                      "<p><a href=\"ir?code=16191727\"> RED 1</a></p>" \
                      "<p><a href=\"ir?code=16199887\"> RED 1</a></p>" \
                      "<p><a href=\"ir?code=16189687\"> RED 1</a></p>" \
                      "<p><a href=\"ir?code=16197847\"> RED 1</a></p>" \
                      "<h2>Creative Stage Controls</h2>" \
                      "<p><a href=\"ir?code=83595375\"> Stage ON/OFF</a></p>" \
                      "<p><a href=\"ir?code=83603535\"> INPUT</a></p>" \
                      "<p><a href=\"ir?code=83593335\"> RESET</a></p>" \
                      "<p><a href=\"ir?code=83591295\"> BT-PAIR</a></p>" \
                      "<h3>Equalizers</h3>" \
                      "<p><a href=\"ir?code=83605575\"> CINEMA</a></p>" \
                      "<p><a href=\"ir?code=83597415\"> MUSIC</a></p>" \
                      "<p><a href=\"ir?code=83601495\"> CONCERT</a></p>" \
                      "<p><a href=\"ir?code=83577015\"> GAMING</a></p>" \
                      "<h3>Bluetooth Controls</h3>" \
                      "<p><a href=\"ir?code=83621895\"> STOP</a></p>" \
                      "<p><a href=\"ir?code=83613735\"> PLAY/PAUSE</a></p>" \
                      "<p><a href=\"ir?code=83617815\"> NEXT</a></p>" \
                      "<p><a href=\"ir?code=83619855\"> PREVIOUS</a></p>" \
                      "<h3>Treble</h3>" \
                      "<p><a href=\"ir?code=83558655\"> INCREASE</a></p>" \
                      "<p><a href=\"ir?code=83607615\"> DECREASE</a></p>" \
                      "<h3>Bass</h3>"
                      "<p><a href=\"ir?code=83587215\"> INCREASE</a></p>" \
                      "<p><a href=\"ir?code=83581095\"> DECREASE</a></p>" \
                      "<h3>Volume</h3>" \
                      "<p><a href=\"ir?code=83583135\"> INCREASE</a></p>" \
                      "<p><a href=\"ir?code=83615775\"> DECREASE</a></p>" \
                      "<p><a href=\"ir?code=83589255\"> MUTE</a></p>" \
                "</body>" \
              "</html>");
}

void handleIr() {
  for (uint8_t i = 0; i < server.args(); i++) {
    if (server.argName(i) == "code") {
      uint32_t code = strtoul(server.arg(i).c_str(), NULL, 10);
#if SEND_NEC
      irsend.sendNEC(code, 32);
#endif  // SEND_NEC
    }
  }
  handleRoot();
}

void handleNotFound() {
  String message = "File Not Found\n\n";
  message += "URI: ";
  message += server.uri();
  message += "\nMethod: ";
  message += (server.method() == HTTP_GET)?"GET":"POST";
  message += "\nArguments: ";
  message += server.args();
  message += "\n";
  for (uint8_t i = 0; i < server.args(); i++)
    message += " " + server.argName(i) + ": " + server.arg(i) + "\n";
  server.send(404, "text/plain", message);
}

void setup(void) {
  irsend.begin();

  Serial.begin(115200);
  WiFi.begin(kSsid, kPassword);
  Serial.println("");

  // Wait for connection
  while (WiFi.status() != WL_CONNECTED) {
    delay(500);
    Serial.print(".");
  }
  Serial.println("");
  Serial.print("Connected to ");
  Serial.println(kSsid);
  Serial.print("IP address: ");
  Serial.println(WiFi.localIP().toString());

#if defined(ESP8266)
  if (mdns.begin(HOSTNAME, WiFi.localIP())) {
#else  // ESP8266
  if (mdns.begin(HOSTNAME)) {
#endif  // ESP8266
    Serial.println("MDNS responder started");
  }

  server.on("/", handleRoot);
  server.on("/ir", handleIr);

  server.on("/inline", [](){
    server.send(200, "text/plain", "this works as well");
  });

  server.onNotFound(handleNotFound);

  server.begin();
  Serial.println("HTTP server started");
}

void loop(void) {
  server.handleClient();
}
Now let’s setup buttons on Android phone to control devices.
Step 4: Setup Remote Control Shortcuts
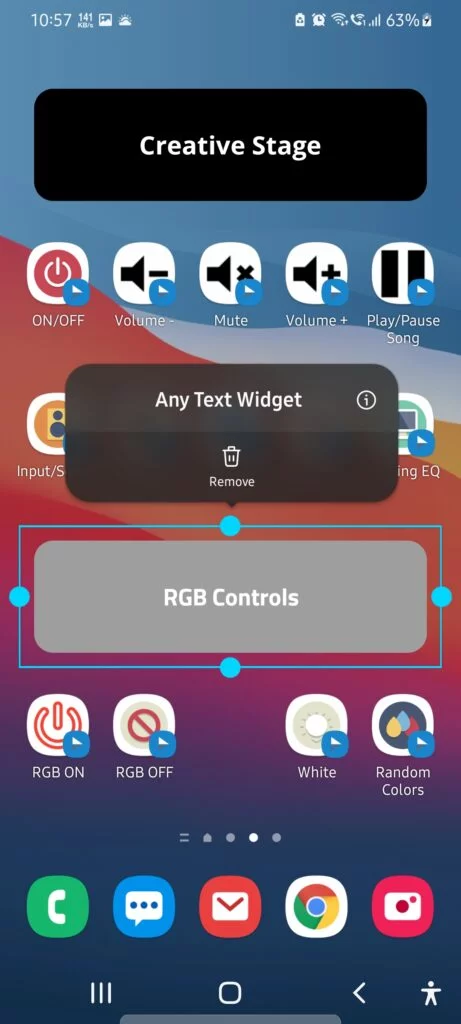
Besides web Browser, you can also control your IR devices by setting up HTTP shortcut button on ANdroid phone. And it looks something like this.
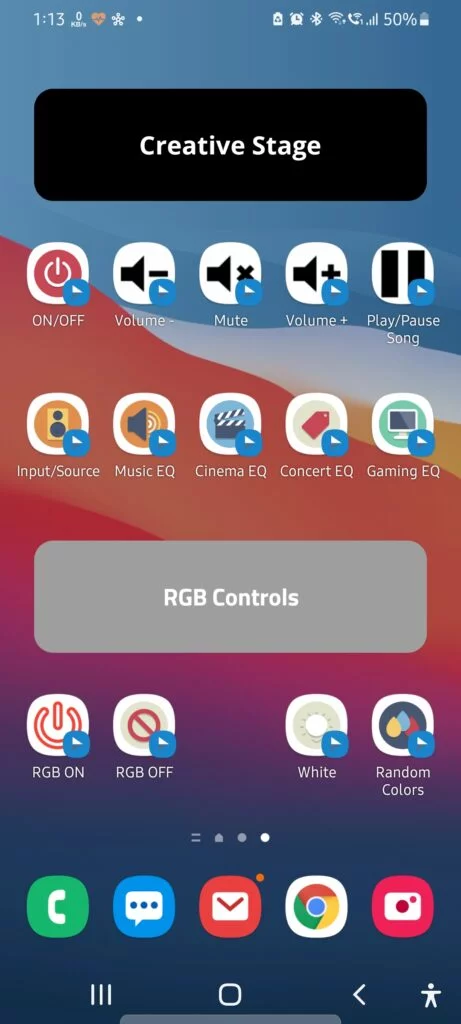
Isn’t that clean.
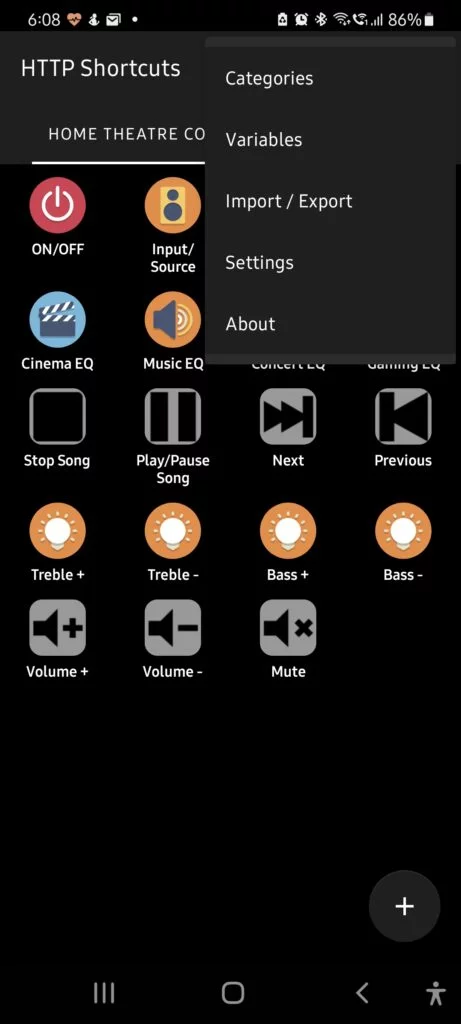
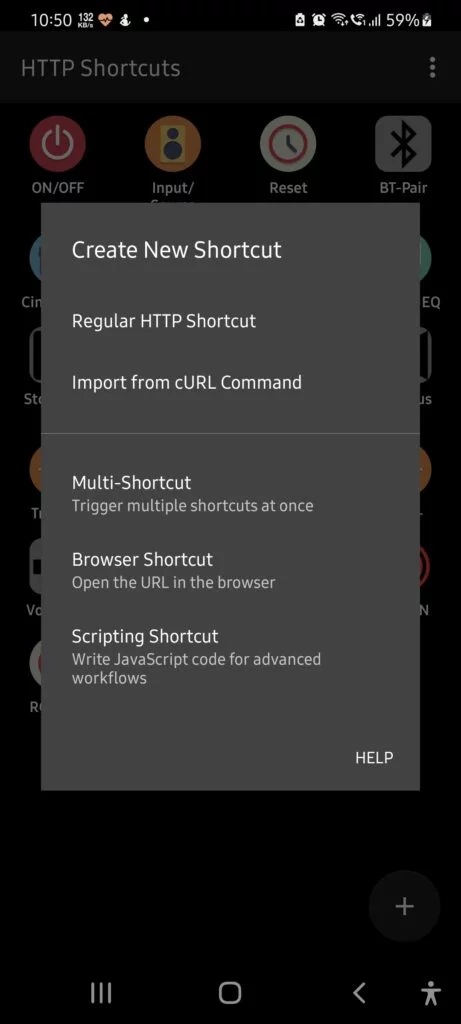
For this, you need to install HTTP Shortcut app on your Android phone. After installation, open the app and follow these steps to create buttons to control IR devices with a single tap.
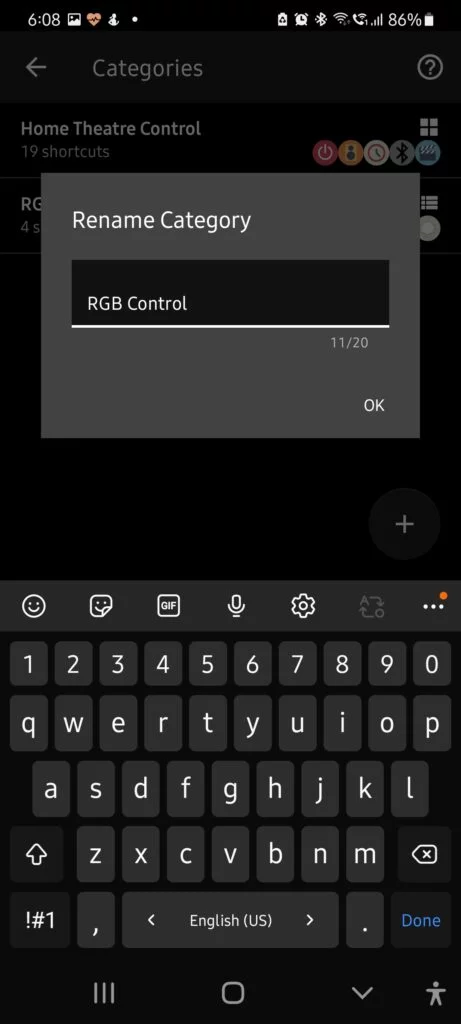
- Tap on three dots and choose ‘Categories.’
- Tap + icon and enter a name to create a category. Each category will belong to your IR device. For instance, I have created two categories, Creative Stage (for 2.1 Audio System) and RGB Control to control my RGB panel.
- Now go back and then tap on the + icon. Choose ‘Regular HTTP Shortcut.‘
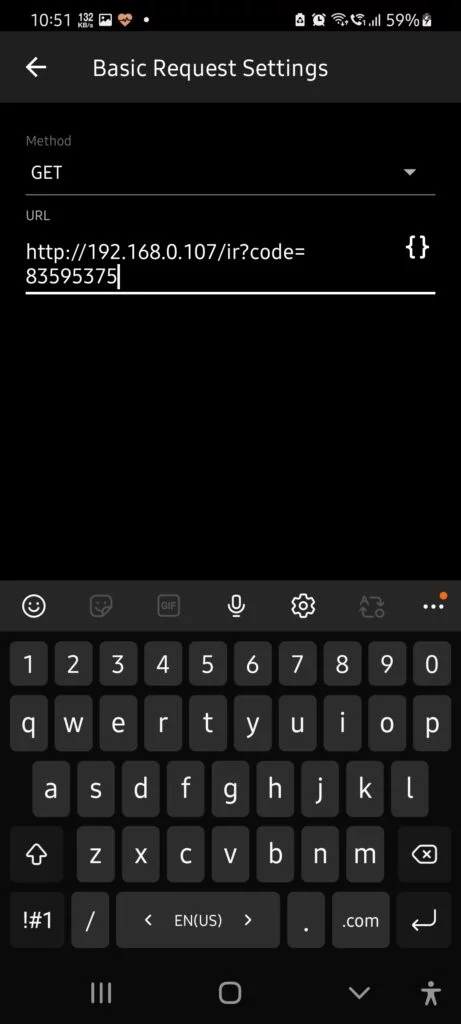
- Type the shortcut name (button name) and description. Then tap on ‘Basic Request Settings‘
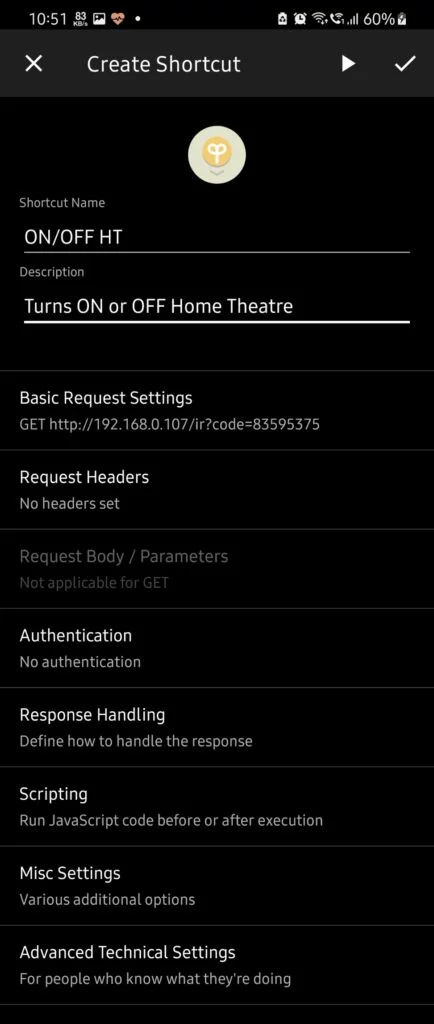
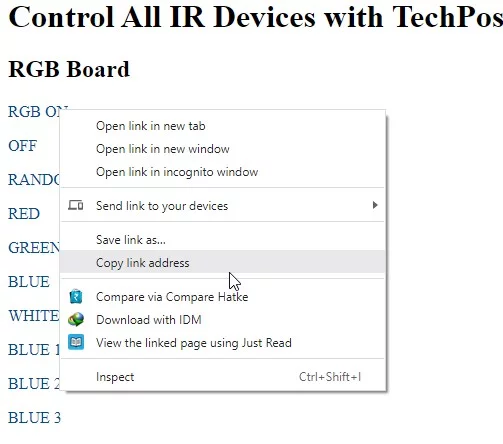
- Copy the URL of the button from the IP address and paste that URL here
- Go back and tap on the Icon at the top. Tap Choose Built-In Icon.
- Select an icon from the list that matches your button name.
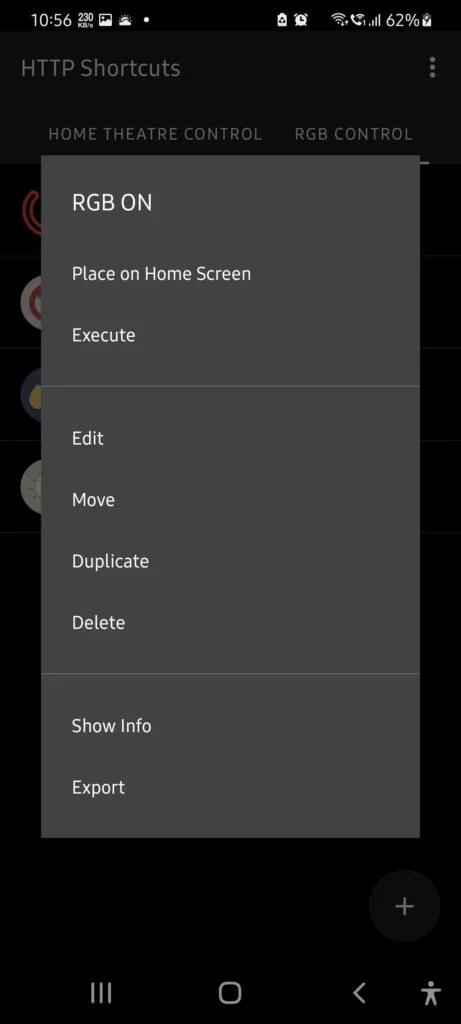
- Then Tap on tick icon at top to save the changes. You will see a new button under your category (IR product name). Repeat the steps to create and map all buttons with relevant URLs.
- Then tap and hold on any button and choose Place on Home screen and then tap ‘ADD‘
This add the button as a small 1×1 widget on your phone’s home screen. You can create a new Home Screen and add all your button widgets.
You can also use a Text Widget app to add text widgets containing product name and then add the button widgets as shown below.
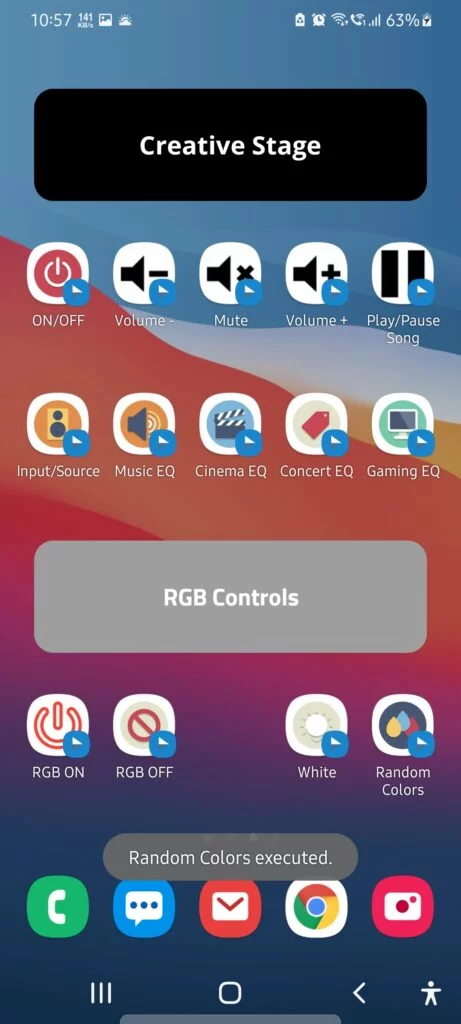
Step 5: Control Your IR Devices
To control the IR devices, as mentioned earlier, you can sue web browser or now, the button widgets on your Android screen. Just tap and control your IR devices in real time.
NOTE: This works on local network only, You can’t control this IR blaster over internet. Thus, your phone and the ESP8266 based IR blaster we built should be connected to same network.
You can use this as an external IR blaster for your Android phone. No need to purchase those 3.5mm headphone jack IR blaster. They just don’t work. So that’s how you build your own IR blaster at home using ESP8266 or NodeMCU.
You can also build a WiFi switch using ESP8266 and control it via both Google Assistant and Alexa.
No, the DIY IR blaster is designed to work only within your local network. It cannot control devices over the internet, meaning both your controlling device (like a smartphone or PC) and the ESP8266 based IR blaster need to be connected to the same network.
The blog post doesn’t specifically mention integrating the DIY IR blaster with smart home systems. However, with additional programming and possibly using services like IFTTT (If This Then That) or creating custom skills/actions for Alexa/Google Assistant, it could be theoretically possible. Expertise in both smart home technology and programming would be required.
To extend the range, you could add more IR LEDs in a circular pattern around the existing one to increase the IR signal’s strength and coverage. Ensuring a direct line of sight to the device being controlled can also help improve performance.
Yes, as long as you can capture the IR codes from the original remote using the IR receiver sensor, you can program the DIY IR blaster to mimic these signals. This includes devices with complex IR signals like air conditioners, where you might need to capture multiple commands for different functions (temperature adjustment, mode change, etc.).
The blog post provides a basic template for a web interface but mentions you can customize it. You would need to modify the HTML and possibly the CSS within the IRServer.ino file to change the appearance, layout, or add new functionalities to the web interface. Basic knowledge of web development (HTML/CSS) is required for customization.