
Table of Contents
Android Pie 9.0 RC2 is the most recent update released on top of the Android 9.0 RC1 release. You can download the most recent release of Android 9.0 Pie ISO and install it on any Windows or Linux PC or laptop. You can dual boot or multiboot Windows 10+Android 9.0 Pie+Linux.
Android x86 9.0 can revive and give a new life to your old laptop. It’s fluid and offers desktop experience on Android. You can play games, install Android apps from Play Store, and do almost anything that can be done via Android smartphone.
There are no minimum system hardware requirements but your device should have at least 1GB RAM for it to work smoothly.

In case you are interested in Lineage OS (formerly CyanogenMod OS) for PC and Laptop, check out – How to Install Android 7.1 or CyanogenMod 14.1 (CM 14.1) on Windows PC/Laptop. RC3 version was released in October 2019.
Installing Android Pie 9.0 on Windows or Linux Laptop & Desktop
Here’s what’s new in the Androidx86 9.1 RC1 & RC2 release,
- Android Oreo x86 now supports both 64-bit and 32-bit kernel and userspace
- Supports OpenGL ES 3.x hardware acceleration for AMD, Intel, Nvidia, and QEMU(virgl) by Mesa 19.0.8
- Supports OpenGL ES 3.0 via SwiftShader for software rendering on unsupported GPU devices
- Support hardware accelerated codecs on devices with Intel HD & G45 graphics family
- Support secure booting from UEFI and installing to UEFI disk
- A text-based GUI installer
- Add theme support to GRUB-EFI
- Supports Multi-touch (up to 10 points Multi-Touch if you have a TouchScreen Laptop), Audio, Wifi, Bluetooth, Sensors, Camera and Ethernet (DHCP only)
- Auto-mount external USB drive and SDcard
- Add Taskbar as an alternative launcher which puts a start menu and recent apps tray on top of your screen and supports freeform window mode
- Enable ForceDefaultOrientation on devices without known sensors. Portrait apps can run in a landscape device without rotating the screen
- Support arm arch apps via the native bridge mechanism. ( Goto Settings> Android-x86 to configure options)
New in Android 9.0 x86 RC1
- Support to upgrade from non-official releases.
- Add experimental Vulkan support for newer Intel and AMD GPUs. (Boot via Advanced options -> Vulkan support)
- Simulate WiFi adapter by Ethernet to increase app compatibility
- Mouse integration support for VMs including VirtualBox, QEMU, VMware and Hyper-V
New in Android 9.0 x86 RC2
- Update to Android 9.0.0 Pie release (android-9.0.0_r52).
- Update to LTS kernel 4.19.95.
- Update to Mesa 19.3.2.
- Update to Taskbar 5.0.1
Step 1. Pre-requisites
- A USB flash drive (at least 4GB)
- 10 GB hard disk space on the computer/laptop drive
- Download the Android Pie 9.0 ISO and save it on your PC
- Download Rufus app
Step 2. Create Android 9.0 Pie Installer Media
CAUTION: Techposts.org or author can’t be held responsible for any damage if caused to your system during or after Android-x86 software installation. Users are advised to proceed at their own risk.
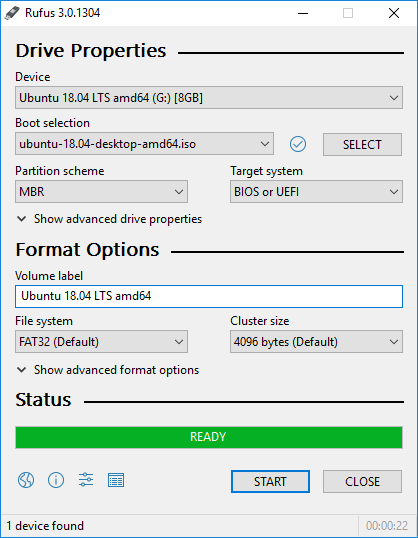
Step 1. Connect the USB drive to PC and run Rufus app
Step 2. Select the USB drive and choose the Android-x86 9.0 ISO file you downloaded and click ‘Start’
Step 3. Once complete, shut down your PC
Step 4: Power on and start pressing boot option key, usually F12, and choose USB drive and press ‘Enter’. You may also move USB at the top in the boot order via BIOS setting

Step 5. Choose ‘Install Android-x86 to hard disk’. You may also choose ‘Live CD’to run and experience Android 9.0 on your Windows PC or Laptop
Step 6: Select the drive where you want to install Android OS
NOTE: If you choose the live CD mode, any changes made to Android OS will not be saved. But if you install Android x86 9.0 OS on system hard disk, then any changes made will be saved such as installing an app.
CAUTION: Please be aware, do not format your system’s HDD unless you don’t want any other OS to run on the system as it will delete all the data including OS from HDD without any warning. If you want to install in system’s HDD, choose “Do not Format” option and proceed further with the installation wizard.
Step 7: Now, follow the installation wizard to install GRUB Bootloader. Make sure to allow it.
Step 8: Select Yes if you’d like to modify your Android x86 installation later
Step 9: Enter a value such as 2048 MB for 2GB space, 8GB is the maximum supported

Finish the installation and choose Reboot.
AFTER INSTALLING Android Pie 9.0 ON PC
After reboot, complete the one-time setup wizard. You may also Install Android Remix OS on Windows Laptop or PC for more stable and true Desktop like experience.
Follow the video guide to install Android 9.0 OS:
The process of installing Android 9.0 Pie x86 is the same as shown in the following video. The only difference is that you need Android 9.0 ISO instead of Android 5.1. So follow the video guide to install Android 9.0 Pie OS on PC if you find written instructions difficult to follow.
Please comment and let us know if you face any problem while installing Android 9.0 Pie on your Windows or Linux Laptop or PC.