
Table of Contents
Today we’ll be installing MacOS Sierra 10.12.6 on An External Hard Drive or Solid State Drive and boot it on any Laptop or PC running on the latest 7th Gen Kaby Lake or even previous generation processors. Also, we don’t need a MacBook for this. So if you have a Windows Laptop, proceed with this tutorial. It’s like a portable OS disk which can be booted on any compatible Laptop or PC. You can read our previous posts on post-installation like How to Fix IntelHD 520, 530, 620, 630 and 640 in MacOS X Sierra 10.12.6: Easy Fix. If you prefer Android, you can also learn How to Install Android 6.0 Marshmallow on An External Hard Disk Drive. Now let’s begin with this guide.
Why Install macOS Sierra 10.12.6 on an External SSD or HDD?
There are many advantages of using an External Hard Drive for installing the MacOS and using it on your PC or laptop. For Example, if your system has only one disk. In that case, you must format the partition in order to install MacOS on your PC. So by that way, you will lose your existing Windows OS and all files if you don’t backup them all.
Hackintoshing is already a very time consuming as MacOS is a very hardware specific Operating System. So backing up Windows and system files or data adds more pain to it coz you would want to install Windows again, maybe at some point. So this way, you are not only saving a lot of time but also the pain and Your pre-loaded Windows Environment. I made this guide very easy to understand and I already edited and created all necessary files and folder to make it easier for you guys. So all you have to is download, copy and paste. Along with that, you must follow the process as shown in this video guide.
I made this guide very easy to understand and I already edited and created all necessary files and folder to make it easier for you guys. So all you have to is download, copy and paste. Along with that, you must follow the process as shown in this video guide. You can find video guide which is embedded at the end of the post.
STEP 1. PREPARE FILES AND SETUP PC/LAPTOP FOR MACOS SIERRA 10.12.6 INSTALLATION
Now let’s go ahead and create MacOS Installation drive. And for that you need at least 8GB USB thumb drive, However, 16GB is recommended.
-
- Download the MacOS.dmg which is around 4GB and TransMac app.
- Once you have downloaded both files, Connect USB Thumb drive to your PC, then run Transmac application as Administrator, and then right click on the USB Thumb Drive and click Format for MacOS.

- Next, Right click again and this time select Restore With Disc Image. Click Yes and Now browse the MacOS.dmg file you downloaded and select it. Click OK and the Yes to proceed. Now, this can take a while depending on your system speed.

- Once it’s finished, you can go to File Explorer and then open the Thumb drive partition. Inside the partition, you will see a few files and folders. Just delete everything. Don’t format drive.
- Next, download the compressed EFI folder from the link given in the description and then extract the EFI folder and paste the EFI folder to the USB Thumb drive.
- Now that you have the EFI folder inside the Thumb drive, you can restart your system. Now Enter the BIOS by pressing F2 quickly as the system reboots. Then First, Deactivate Secure Boot.

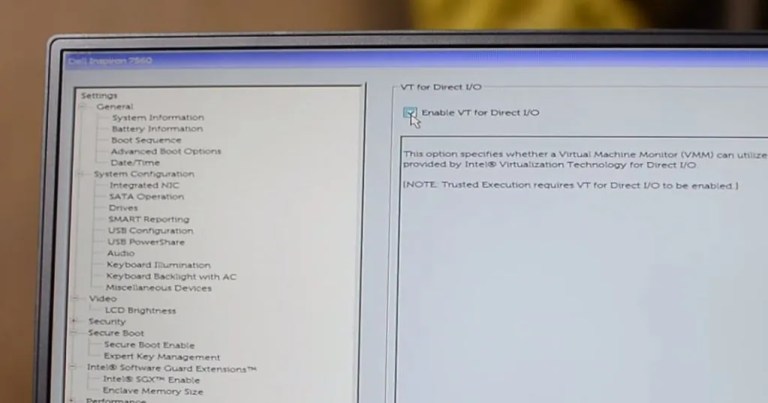
- Under virtualization, disable VTD or VT for Direct I/O. That’s it. Now boot your system and press F12 to see Boot options. Select your thumb drive to begin the installation. That’s it. Now boot your system and press F12 to see Boot options. Select your thumb drive to begin the installation.


- On boot, you will see this clover bootloader screen. From here, you need to select the disk that says “Boot Mac OS X from Hackintosh Sierra Zone”.

STEP 2. INSTALLING MACOS SIERRA 10.12.6 on External USB Disk
You will see the Apple logo and it will start loading the installation file. Now if you get any error here, I want you to please take a screenshot, upload it to the cloud and share the URL via Facebook Fan page, the link is in the Description. Also, mention system properties only then I will be able to help you fix any error.
-
- If everything is good, you will see the installation window. Proceed to next step by pressing forward arrow button, and agree to all terms and conditions.
- Next, click on Utilities to open Disk Utility. Then choose the External Hard drive or SSD drive where you want the Mac OS to be installed. Make sure the volume or disk is empty as this will delete all data from the disk. In My Case, it’s the StoreJet Transcend 3.0 Enclosure containing a Samsung 750 EVO SATA SSD. SO On top, click Erase, Give a name to the disk, then select Extended (Journaled) and GUID Partition from the drop downs. Finally, Hit erase, this will format the hard drive and make it ready for Mac OS Installation.


- Now close the Disk Utility program and select the External Drive which I named as MacOS. This will begin installing the Mac OS on your System. This may take 20-30 minutes, depending on your system and storage type. SSD will be quicker than the traditional Hard disk drives. Once the installation is finished, you will see a message that says, MacOS could not be installed on your computer.
- Just ignore this message, as MacOS has been successfully installed on your system. This is an error message. So ignore it and click on Restart.

- Now again press F12 to choose USB thumb drive as a boot drive and then in clover bootloader, choose Boot from MacOS 10.12.6.
- This will boot the MacOS from the disk where we installed it. This may take a while and Once it boots up. Do the initial setup like Choose Region, Timezone, Agree to terms etc. and choose an Account name and enter a password.
- That’s it, you have successfully installed the MacOS Sierra on your Kaby Lake laptop or PC. Wait for a While until everything sets up.

STEP 3. SETTING UP MACOS SIERRA AND UPGRADING TO SIERRA 10.12.6
- Wait for a While until everything sets up. Now connect to the internet using the Ethernet port of your PC or Laptop as Wi-Fi will not work. Then go to AppStore. Click on Update icon and the app store will start fetching details of any update available. You don’t need any Apple ID here.
- It will show you the update, just click on Update a dit will download the 10.12.6 Sierra update on the system and once downloaded it will reboot automatically and will start installing the update. You will see this window.

- Now the system will reboot itself and again you have to press F12 and select USB drive and then boot Sierra 10.12.6 Disk.
- Now there’s a good chance that you get error or kernel panics. So again, upload the Screenshot of error and your system configuration. One simple thing you can do if you get this Graphics buffer error is that restart system. Then go to clover option and then go-to Graphics Injector and the in the Ig-platform field, press enters to edit the value.
- Delete the existing ID and enter 123456789. This is an invalid platform id but it will let system boot completely. After that, use multi beast and install UEFI bootloader to MacOS 10.12.6 Hard drive. After that, use EFI mounter and mount EFI partition.

Inside EFI partition, delete the EFI folder and paste this new EFI folder. Once you did that. Remove the USB thumb drive as we don’t need it anymore. Just reboot your system, and press F12 and this time you will see the UEFI disk where MACOS installed. Select it and then again select MacOS10.12.6 disk. Your system will boot completely and then you can log in to your system and check system information.

Now at this point, you have successfully installed MacOS Sierra 10.12.6 on your Windows Laptop or PC powered by 7th Generation Kaby Lake processor. Again, if you get any error share with me, by visiting the Techposts Facebook Fan page. I will answer to each and everyone.

Watch this Video tutorial:
https://dai.ly/x6z3tb4
But if everything works fine, you can wait for the next guide where I will show you how to make IntelHD graphics work. So Stay tuned, subscribe to our channel, Hit the bell icon for new video updates. Like this video, share this video and comment your problems, queries, thoughts, and suggestions in the comments section down below.