
Hey, Welcome to the new How to Guide from Techposts.org. Today in this HowtoGuide we will show you how to Install Android 5.0.2 Lollipop on Any PC or Laptop along with windows, that is dual boot – Android Lollipop with Windows 7, 8 or 10, Linux or MAC.
Update – What’s New in Lollipop 5.0.2 x86:
- Wifi and Bluetooth Working perfectly fine.
- PlayStore and Google Apps preinstalled
- Much better than previous 5.0 Update
- Many other important Bug Fixes
Android mobile operating system is an open source system software available for various smartphone, tablet devices, and Desktops too. In our previous Videos we showed you How to install Android 4.4.4 KitKat on PC and laptops but This time we will be installing the latest Android version which is Android 5 Lollipop on Laptop and Desktops.
With This installation Method, Users can multi Dual Boot Android with Windows on PC and Laptops powered by x86 (32-bit) or x64 (64 Bit) computer architecture hardware. Users are required to Download Android x86 ISO File and can install it via bootable USB flash drive or bootable CD/DVD.
Also Read: How to Dual Boot Remix OS with Windows OS – UEFI / Legacy Support
Step1. Things you’ll need?
- 1 USB Flash Drive or Bootable CD/DVD.
- 4GB Free Hard Disk Space for Android installation.
- Android x86 5.0.2 Lollipop ISO File. Download it from Here
- Universal USB Installer Tool to create bootable USB thumb drive. You can Find the Links in Description.
Installing Android on PC
Step 2: By using Universal USB Installer Tool, Make a bootable USB flash drive using the ISO image file that you downloaded.
Must See :
- How to Install Android x86 5.0.2 on USB Drive
- How to install Android 5.0.2 Lollipop on PC with Androidx86 Installer
Select Android from the Drop Down menu, Then Browse the Android x86 ISO file and then select the USB Thumb Drive and Hit Create Button.
Step 3: After that, Restart your PC or Laptop via USB flash drive as the source. (Make USB to boot first and before CD/DVD ROM under your system’s BIOS settings)
Must-See: One Click Android x86 5.1 Lollipop OS Installation on Windows PC – Dual Boot PC
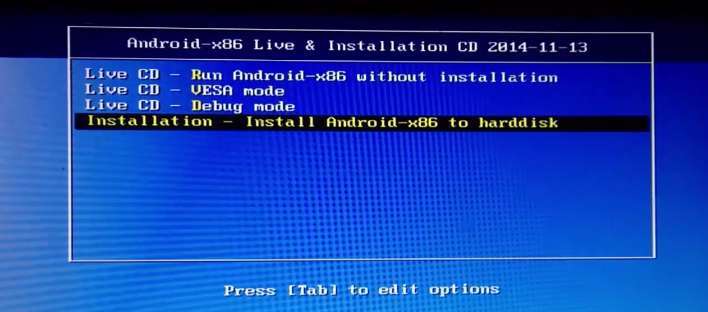
Step 4: Now, When the menu appears, just select Install Android x86 to hard disk. You can also Run it As a Live Cd which means that if any changes made, they will not be saved. But if you install it then any changes that you make will be saved next time you boot android.
Step 5: Select your appropriate hard disk partition to install Android x86 i.e. C: or D: or you can install on any new partition.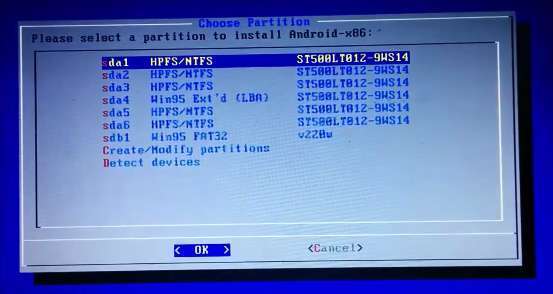
Step 6: Now, You will get a few prompts messages pertaining to the installation of GRUB Bootloader. Make sure to allow it.
Also See: How to Install Android 6.0 Marshmallow on A External Hard Disk Drive
Step 7: Now, another prompt message will ask you to make system /r/w. Hit Yes on this as well, especially if you’d like to modify your Android x86 installation later.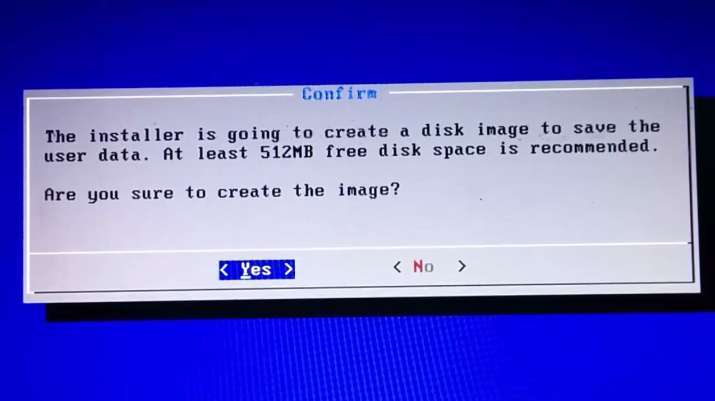
Step 8: After that, you will get another prompt to install virtual SD card. Use 2048 MB for space, as that’s the maximum supported.

Step 9: Now, You can Restart your Windows PC / Laptops. After Reboot, You can select to either boot Android or Windows.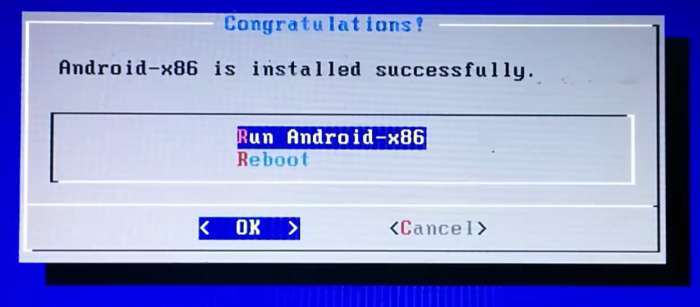
Voilah! You’re done. Congratulations!! You have successfully installed Android 5.0 Lollipop on Your Desktop PC/Laptop. Enjoy this latest update.
Also, See :
- How to Install Android 5.0 Lollipop on Any PC or Laptop with Windows, Mac OS or Linux (Dual Boot)
- How to install Android 4.4 KitKat on PC with Androidx86 Installer
- How to Install Android Kitkat 4.4.2 on PC and Laptop with Windows
- How To Install Android 4.4.2 KitKat on Computer or Laptop
- How To Install Android 4.3 Jelly Bean on PC and Laptops
If you have any questions or feedback, please use the comment box below. If you face any problem during Installation, please contact us, and we’ll do our best to solve your queries.
Before You Go…
Just wanted to let you know that We’ve launched YouTube Channel where we upload awesome video content. Make sure you hit the subscribe button to stay up to date with the new videos we upload every week. Also, Subscribe us for more How-To Guides and Reviews…!!! @http://youtube.com/ravisingh9 for more How to Guides. Enjoy..!!!